ASP Topics
ASP Introduction
What are Active Server Pages (ASP)?
Active Server Pages (ASP) is a server-side technology addressing the growing need of dynamic and decision-making oriented Web content. It is a “server-side” technology because it is run on the server upon client’s request for a Web page.
Historically, web sites were static: lacking information processing capability. A static web site, for example, cannot process an order or other information from its visitors. Thus static web sites are not very useful when it comes to processing information.
Because a static web site is just a collection of plain or HTML-formatted text, every time the web site loads the exact same content is shown. A static website has to be changed manually to add new content. It is not very efficient to manually update content when it can be easily changed or updated automatically. Suppose we decided to display current date on our web pages. Daily manually changing the date on all of our web pages is not very efficient. Instead of manually editing the date, we could once write an ASP script and the script will automatically output the current date on our pages. It is much more efficient to write a script once for outputting the date and have it executed as many times as needed than manually editing date on every single day.
A page containing script that produces changing content is known as a dynamic page. With dynamic pages, for instance, we can allow visitors to login to access their personal account information or have content generated instantaneously from a database. ASP is one of the many solutions used to create web sites that are customized to the user needs and that are interactive to the user.
ASP scripts can be written with any text editor, including with these:
There are four programming languages that can be used to create an ASP page. They are VBScript, JScript, PerlScript, and Python and any one these can be used to create an ASP page. We will use VBScript to write ASP pages for our examples on this site.
Client-Server Model
Before we proceed, let’s define some important terms. A web site address is also referred to as Universal Resource Locator (URL). It is a unique domain name that identifies a specific page on Internet. An example of a web site address is http://www.scriptbuzz.com. Browsers such as Internet Explorer or Netscape are a special program that communicates with the server to access the requested Web information. The computer that is requesting the information is referred to as the client server or simply as client. From where the requested information is being sent, is referred to as the Web server. The Web-server is a special computer designed to process Web related scripts.
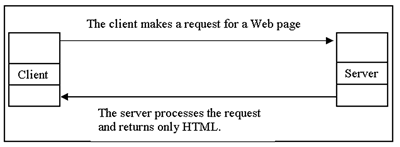
Chances are you’ve used internet before; if not, you can type a web site’s address on the browser’s address window. What happens when you press enter or click on the “Go” button? Is it that the web content is displayed on the client server? The appearance of the web content on the client side is the last step! Before the web content is displayed on the client side, series of steps are performed in the background. After a client makes a request for a Web page, the server processes the request and returns only the plain HyperText Markup Language or HTML text. What that means is that once, for example, ASP scripts are processed on the server, sever sends only the output, as HTML, of those scripts to a browser. Figure 1 displays the client server interaction.
Server-Side Scripting
The web server is not only responsible for processing HTML tags but also the ASP scripts. The ASP engine, installed on the web server, is responsible for processing ASP scripts. Because the browser can only display HTML compatible text, it is the responsibility of ASP engine to process the ASP scripts and send the results back as HTML text to the client. In other words, the Web server sends HTML text, part of which may be the result of the ASP scripts.
You might be thinking how the Web server can determine whether to call ASP engine or not. You should recall from your HTML experience that HTML files have the .html or .htm extension. Similarly, .asp extension is used for ASP scripts. An .asp file extension indicates to the Web server to call the ASP engine. HTML tags inside an ASP file are processed by the ASP engine; however, an html file (meaning a file that ends with .htm or .html) containing ASP code won’t run the ASP code!
Once the Web server sends the results to the client, it is the client’s browser responsibility to display HTML text. Again, the client’s browser only receives HTML text. This can be confirmed, for an asp file, by viewing the source code in the browser window. Note server-side scripts are processed before a page is downloaded on a browser, and client-side scripts are processed after a page has been downloaded. When we are writing ASP scripts, we are writing pages for server-side processing. Table 1 summarizes the differences between client and server side scripting.
| Table 1 – Summary of Client-side and Server-side Scripting | |
|---|---|
| Client-side Scripting | It is the client’s responsibility to process client-side scripts. The client-side scripts are not processed by the Web-server. Client-side scripts are processed after a Web page has been downloaded onto the browser. Client-side scripting is useful for validating user’s input. |
| Server-side Scripting | A web server is responsible for processing ASP scripts and returning output to the client. The server-side scripting is done before a page is downloaded on the browser. ASP scripts is a server-side technology. |
The following provides a breif summary of the steps involved in processing ASP files:
- A web browser requests an ASP file
- The web server recives the request and loads the ASP file.
- The server executes the code inside the ASP file. Any output from this processed ASP code is sent to the browser in HTML format, along with any other HTML content.
Because Active Server Pages is a server-side technology, it offers number of notable advantages:
- ASP code remains on the server. Because ASP code does not leave the server, the user does not learn about how the page is built. This provides a measure of security of your ASP code and other files used in conjunction with your ASP code.
- ASP is a stable and matured technology. Microsoft, third-party vendors, and developers, are some of the players providing support (i.e., tools, components, scripts, discussion boards, etc.) for the ASP technology.
- An ASP file can use databses or other files available to the web server to produce the desired output.
Personal Web Server & Internet Information Services
To run ASP scripts, Personal Web Server (PWS) or Internet Information Services (IIS) must be installed on Windows. A PWS is intended for Windows 95 or 98 or NT. The IIS is intended for latest versions of Windows. This installation sets up your computer to act as a server when it is executing the ASP code that you will write. Of course, when your computer’s browser is requesting the page, it acts as a client. Installing any one of the Web servers mentioned above, should create a folder called inetpub and a subfolder called wwwroot on the hard-drive. All of the ASP scripts must be saved with an .asp file extension under the wwwroot folder or in a subfolder under wwwroot, as long as you remember to set IIS to the folder in which your ASP code exists. For more information on installing the PWS or IIS, please visit http://support.microsoft.com/ and search for IIS Installation.
Defining a new website in IIS 6.0
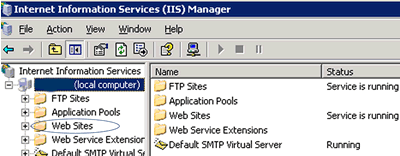
Defining a new site in Windows 2003 is easy. First open the Internet Information Services (IIS) Manager by pointing to Start | Programs | Administrative Tools | Internet Information Services (IIS) Manager. Next, click on the “local computer” to expand for ore options and then, right click on “Web Sites.” Figure 1 shows the IIS interface.
After right clicking on “web sites”, choose new | web site. After that, you’ll be presented with a web site creation window; see figure 2. This window and the subsequent windows will guide you to define a website.

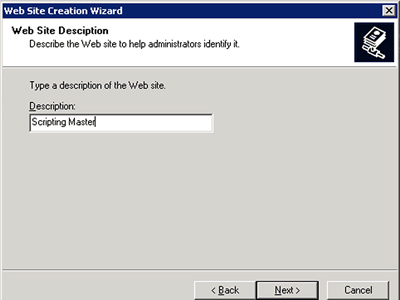
Click “Next” on this window web site creation window if you want to continue defining a website. The next window will ask you for “web site description” and there you should enter a brief description for your website. The purpose of this description is to help you distinguish this website from any other websites you define on that server. Also, the description is required just like file name to save document on a computer. See figure 3 for this window.
In the next window, you will specify how you want the server to determine which website to serve for Script Buzz’s website. If you are not running more than one website on the same server, leave this as the default and click Next. If you are running more than one website on the same server, you can use host header value such as www.scriptbuzz.com. See figure 4.
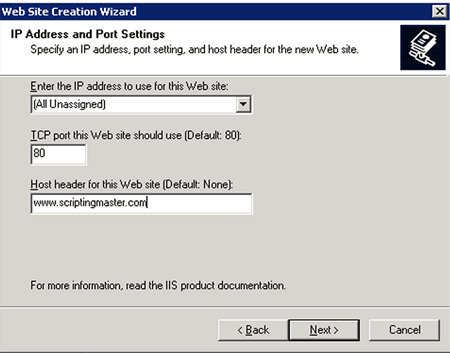
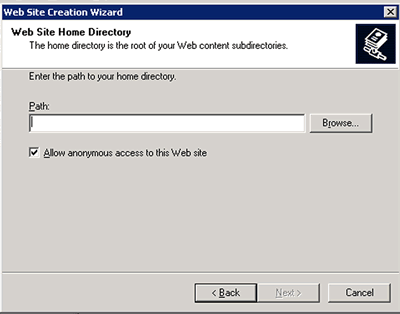
After you enter a host header value (or selected an IP address or different port) from that window, click “Next” to continue. In the next window, you are asked for the website’s home directory. The home directory simply refers to a folder that contains all of the files and folders (images, webpages, etc.) that pertain to your website. Browse to that home directory click “Next”; see figure 5 for this window. After you click “Next”, a new window will display whether the web site configuration was successful or not.
How to create your first ASP script
Now, let’s write a simple ASP program to print the following message: “Welcome to ASP!!” First, recall the browser receives only the output from the Web-server. This means we must have some HTML code in our ASP example program to see the results on a browser. Second, HTML code can be used in an ASP file. Here is an example:
<html>
<title>My first ASP page </title>
<body>
<% Response.write "Welcome to ASP!!" %>
</body></html>
Notice we begin with the usual HTML tags: <html>, <title>, and <body>. If we want our results to be displayed on the client-side, we must use the HTML tag. The ASP tag <% was opened last and it is the one that is closed first.
The ASP code begins with <% tag. To print the message, we use the Response.Write object. Respone.Write is an ASP command to for displaying information on the browser. VBScript is not case sensitive. RESPONSE.WRITE will also display the message. The message that we want to display should be enclosed inside the double quotations “”. Because we want to print “Welcome to ASP!!”, our code looks like Response.write “Welcome to ASP!!”
The %> tag ends the ASP code. Again, ASP code should be enclosed inside of this opening tag <% and the closing tag %>. You should type this code in Notepad or in any other text editor you prefer. Then save it with an .asp file extension. This file should be saved in the inetpub directory under the wwwroot folder. For example, you might save it as firstPage.asp in the wwwroot folder.
Once you have opened a browser window, just type in the URL of the page you are trying to access. The URL should look something like this: http://localhost/firstPage.asp, which means we are accessing a file called “firstPage.asp” from our local machine. When you are requesting this page, you are acting as a client, when the server receives this request it begins to process the file, in this case, firstPage.asp.
The ASP engine processes this request because our file ends with an .asp extension. It is the ASP engine responsibility to process the code between the ASP tags. In this case, a message is printed, enclosed in quotations after the response.write object. The processed output is simply an HTML text and is sent back to the client. The client displays the message, as normal HTML text, as shown in figure 1.

Data Buffering
When ASP code is executed, the output of the code is sent in one of two ways:
- output is sent as the code is executed, or
- output is sent after the complete code (the entire ASP file) has finished executing
How is that of any significant? It is very significant if you have a ASP file that takes longer to execute perhaps because it has to access data from multiple databases with complex queries. While the code is being executed and no output is generated for some time, what will the user think of your page? They are likely to think the page is broken and may attempt reloading or may simply leave the page (or website). Buffering is an easy way to control how and when the output is sent to the browser.
What is buffering? When the server sends the output after completely evaluating the entire ASP file, it is known as buffering. If the output is buffered, the server temporarily holds the output (i.e., does not send a response to the browser) until all of the code has been processed, or until the Flush or End method is called. Simply put, buffering prevents the server from sending any response to the browser until the server is completely done processing the code.
If you have pages that minimally use ASP code and the code executes faster, your user may not notice any difference whether or not you are using buffering. In this case, you could care less about how the data is buffered. If, however, as mentioned before your script is accessing data with complex queries from multiple databases, the user may be frustrated if no output is shown for a while. Consider buffering for better control of the output. On Windows 2000 in IIS 5, buffering is turned ON by default; however, on Windows NT 4 In IIS 4, buffering by default is turned off. You may use this statement to learn whether or not buffering is ON or OFF on your server:
<% = response.buffer %>
To change buffering setting for an entire website, you can go to the website properties in IIS to change. The following shows how to enable or disable buffering in IIS 5:
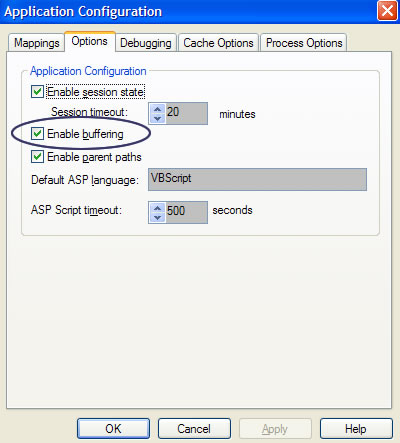
(or deselecting) the “Enable buffering” check box, as shown in this window.
To access this window, access the property panel for the desired site from the IIS. On the Default Web Site Properties window click on the Home Directory tab. Then, click configuration to go to the Application Configuration window. Lastly, click on the Options tab to see a window similar to the one shown above.
You can also enable or disable buffering at the page level context. To turn buffering OFF for a single page, use this statement in the beginning of your ASP code:
<% response.Buffer = false %>
Similarly, you can turn ON buffering by placing this statement in the beginning of the code:
<% response.Buffer = true %>
The following table summaries the two possibilities of buffering:
| Buffering State | Description |
|---|---|
| True | This state indicates buffering is enabled. Thus the server holds output until all of the scripts on the page have been processed. |
| False | This state indicates buffering is disabled. Thus the server sends the output as your script is processed. |
The following examples show buffering in use. In the first example below
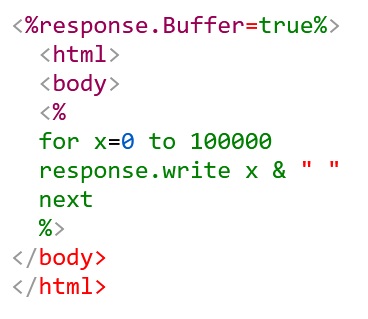
set buffering to true. Because in this code we are using a loop that will execute at least 100,000 times, nothing will be sent to the browser until this loop has finished executing. Once the loop is finished, the HTML output will be sent to the browser. The server in this example will hold the output until the loop has finished executing. If the server is busy with other processes, it may take sometime for the user to receive any output. For the right reasons, you may not want the user to see any output until the entire code has finished executing. But you also do not want the user to wait for any output back from the user. (Realize in the example, we are saying buffer any output until our loop has finished executing. Because the server is prevented from sending any output, how can we send any output to the user?) Well, we can use the flush method whenever we are ready to send any output:
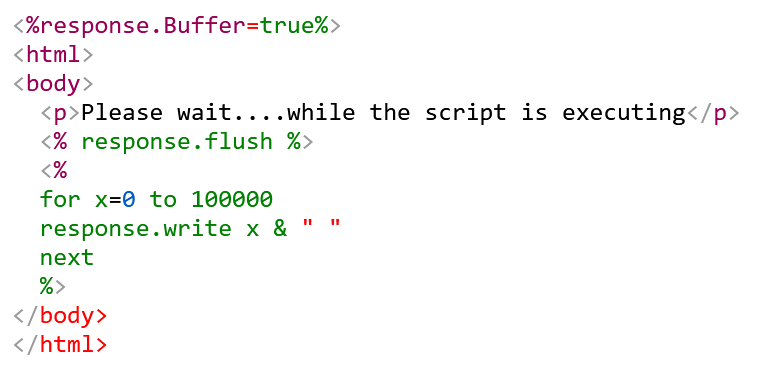
Output, if any, is sent immediately to the browser when response.flush statement is processed by the server. The statement simply tells the server to empty the output buffer.
If a need arises for you to delete the output buffer, you can use the clear method. With the clear method you can start the output from scratch.
The following provides a brief description for each of the buffering method:
| Buffering method | Purpose |
|---|---|
| response.flush | This sends to the browser whatever has accumulated in the output buffer. |
| response.clear | This wipes out the output buffer. This allows you to start your page from scratch. |
Redirecting the browser
While in developing web applications, it sometimes becomes necessary to redirect the user (or browser) to a particular page of your application. For instance, when the user enters the correct login credentials to access your web application, you may redirect that user to an entry page of your web application. If, however, the input login information is incorrect, you may redirect the user back to login page. The response.redirect statement can be used to send the user to another page. In the following code, we
response.redirect "http://www.scriptbuzz.com/html/html.asp"
send the user to html.asp of the Script Buzz’s web site. The html.asp is the destination page and the page that contains the above code is the referral page. Once the above codes executes, the user will immediately be sent to the destination page. Note how we included the entire URL of the destination page in the redirection statement: the website address, the folder/directory, and the page itself. It is not, however, necessary to provide the domain name and folder or directory path if both of your destination and referral pages are within the same folder. Suppose we have a folder named asp and it has both of our pages: the referral page (login.asp) and the destination page (members_only.asp). In this case, our redirect statement would just be (in login.asp):
response.redirect "members_only.asp"
Data types
Data types are essential part of any programming language primarily because they allow error checking and determine the size of memory allocation, what kind of information can be stored, and what operations can be performed to a variable. However, in VBScript we do not need to worry about specifying the data type of a variable because our use of the variable and its context will determine what operations can be performed on the variable.
What is data type?
To make programming languages more efficient, data is categorized into most common types: integer, float, double, string, Boolean, date, and currency. Except for currency, all of these data types will be discussed in this chapter in the order they are listed. An integer type indicates that our data type is a whole number such as -2, -1, 0, 1, and so on. If we wanted to find out how many classes a student is registered for this semester, we can be certain that the response would be a whole number: 0 or greater. However, if we wanted to find out the name of the student, we should expect a response that contains letters of the alphabet.
Unlike C/C++, VBScript allows any type of data assignment to a variable. For example, a variable called NumberOfClasses could represent the number of classes a student is registered for. In addition, this same variable in the same program can also represent and store the name of the student. In C/C++, however, this is not possible because a data type number must store numerical values only, not other data types.
Integers
An integer is a whole number, without a fractional portion. Examples include number of automobiles a student owns, number of hours in a day, number of days in a year, etc. Using the correct data types in any program is a very important step because then the programmer can decide what operations can be performed on the data. If for example, an integer is expected from the user, then, the programmer has to make sure that only mathematical operation are performed. In other words, only mathematical operation can be performed on numerical values.
Floats
A float is a number with fractional portion such as -1.3, -.45, 4.56, 10.0000, etc. Examples include 1 divided by 3, amount due at a check-out, etc. Maintaining floats’ precision requires more memory than integers which do not have fractional parts. As a developer of scripts for ASP, you need not worry how this is handled because VBScript automatically determines the data type from the context. VBScript will automatically allocate sufficient memory to perform the operations on any data type. Consider a simple example, if you were doing integer division: 10 divided by 2. The answer 5 will be stored as an integer. However, dividing 1 by 3 has infinite “3”‘s to the right of the decimal point; consequently, the result won’t be stored as an integer.
Double
A double is similar to floats except the precision is twice as much as of a floating-point number. An interesting example is temperature, which has many trailing digits but is rounded-off to an integer for simplicity. Thus doubles have more precision and require more memory.
String
A string type consists of letters, numbers, or symbols. “Active Server Pages”, “5mph”, and “15” are all example of strings. It is very important to note that the strings are included inside of double quotation marks.
Boolean
Boolean types are used to indicate any one of two states, for example, TRUE or FALSE, 0 or 1, ON or OFF, etc. A Boolean type is used to make decisions depending on the value of the variable used to represent Boolean type.
Date
A date type can hold time or date. It is a great feature of VBScript. The date type can be used to represent strings and/or integers.
Working with Variables in ASP
What is a variable?
A variable is a qualified name to a specific part of computer’s memory. “Qualified” means the name of the variable must be legal in VBScript. Like other programming languages, you cannot name your variable to be one of the reserved words in that language. With variables, we can change and store data values. Without variables, we would only be able to display results; we won’t be able to store the results for future use.
Syntax requirements for variables
There are number of syntax requirements for variables. First, as discussed earlier, reserved keywords of the language cannot be used as variable names because reserved words have special meaning in the language. For example, DIM indicates to the script-processor that variable(s) are about to be declared. If a programmer attempts to declare a variable with the same name as a reserved keyword, an error will occur. Secondly, a variable name must not contain spaces, periods, or dashes. For example, the following are not valid variable names:
This is my variable ‘because of spaces
This.is.my.variable ‘because of periods
This-is-my-variable ‘because of dashes
If a variable name is long, then, use underscores or mixture of uppercase and lowercase letters as
This_is_my_variable ‘using underscores at word breaks
ThisIsMyVariable ‘using uppercase at beginning of each word
Lastly, a variable name must begin only with a letter not other characters or numbers. The following are not valid variable names:
1_This_is_my_variable ‘because of 1
_ThisIsMyVariable ‘because of _
^_ThisIsMyVariable ‘because of ^ and _
Although variable names should be meaningful, their names length should not be longer than 255 characters. The ASP engine will ignore the characters after the 256th character in the variable name. Hopefully, naming conventions from the next section will help you to name our variables in more meaningful way.
Variable naming conventions
In the previous section, we covered the rules for variable names and these rules must be followed to avoid errors. In comparison, naming conventions are not required by the language but rather are helpful to the programmer and to others who will look at the code. Because VBScript determines from the context the type of the variables, the programmer should use the data type prefix in the name.
Another important guideline for naming variables is that the variable names should be descriptive. For example, x as a variable name is a poor naming choice unless it represents x-coordinate values. Even better yet, a variable for representing x-coordinates should be named as xCoordinate or x_ coordinate instead of just x. Using meaningful names for variables help not only others to easily understand the code but also the programmer, especially when reviewing it a year from now.
An example of working with variables
Before a variable can be used, it needs to be declared either explicitly (by the programmer) or implicitly (by the computer). A variable declaration simply refers to the process of allocating memory to the variable.
We explicitly declare a variable with the keyword DIM and then the variable name. For instance, DIM x declares a variable named x. You can also declare more than one variable per line, make sure each variable name is separated with a comma:
Dim x, y, z, h
The following shows an example.

We declare a variable named five by placing the variable name after the reserved keyword “DIM” on line 4. Note that we cannot declare a variable named DIM because this is a reserved keyword in VBScript. Similarly, we next declare the variable result on line 5. We could have declared both of these variables on one line as:
DIM five, result
Remember declaring multiple variables on one line without separating them with commas i.e., DIM five result, is a syntax error.
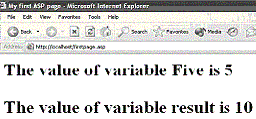
On line 6 in Listing 1, we assign the value 5 to the variable five. “Assign” means setting the value to the left hand side of the equal sign (also called assignment operator) with what is on the right hand side. To confirm this assignment, we print the value of five by using the response.write object on line 8. Because we want to print the value of a variable, variable name (in this case, five) is not included in double quotation marks. The lines response.write “The value of variable Five is ” and response.write five print “The value of variable Five is 5”.
The next line result = five + five adds the variable five to the variable five, obtaining 10. The result variable is assigned the value 10 with the assignment operator. Next, on line 10 we print a new line using the HTML tag for a new line Response.Write “<br>” enclosed in double quotation marks. This means the next output on the browser will be printed on a new line instead of on the same line. Note that HTML tags must be enclosed with double quotations marks when using response.write object.
Similar to lines 7 and 8, lines 11 and 12 print the value of variable result is 10. Finally, we close the ASP script tag on line 13. Figure 1 shows the output.
Constant variables
A constant is a variable whose value is not changed by the execution of the program. Most of the time, a program is written to modify the values of a variable. In some cases, however; we want to use the same value throughout the program. Examples are tax rate, hours in a day, etc. If our program was calculating a total sales amount owed by a customer, we would add the sales amount plus the current tax rate. We know that the sales amount is likely to vary because each customer would buy something different but the tax rate is likely to be the same for all taxable purchases. We could represent the tax rate as a constant because tax rate won’t change frequently. If the tax rate did change, we could just set its old value with the current value. A constant variable means that its value will not be changed while the program is running. By the way, constant variables are capitalized to convey that they are constants.
We would declare a variable to represent tax rate as a constant by the following:
const TAXRATE = .05
Notice that we do not use the reserved keyword DIM before const. See the following example that uses a constant variable:
const TAXRATE = .05DIM intItems, fltCostPerItm, fltAmtBeforeTaxes, fltTotal, soutintItems = 10fltCostPerItm = 2.69fltAmtBeforeTaxes = intItems * fltCostPerItmfltTotal = (fltAmtBeforeTaxes * TAXRATE) + fltAmtBeforeTaxessout = "Cost Per item: $ " & fltCostPerItm & "<br>"sout = sout & "Number of items bought: " & intItems & "<br>"sout = sout & "Total Before Taxes: $ " & fltAmtBeforeTaxes & "<br>"sout = sout & "Total after taxes: $ " & round (fltTotal, 2)response.write sout
We declare and assign a value to the variable TAXRATE on line 1 above. After a value has been assigned to a constant variable, its value cannot be changed later in the program. In our example, we cannot change the value of TAXRATE after line 1; for instance, this won’t work if you had this code after line 1:
TAXRATE = .07
You will get an “Illegal assignment: ‘TAXRATE'” error if you update the value of the constant. The rational behind using constant variables is to assign a value once and use it as many times needed without changing its value while the program is running. If you did have to change the value of a constant variable, you will update the value only at one place versus using a no variable at all, in which case, you may end up updating the value on many places. The following shows the output of the above code:
Cost Per item: $ 2.69
Number of items bought: 10
Total Before Taxes: $ 26.9
Total after taxes: $ 28.24
In summary, a constant variable should be used whenever a variable’s value won’t be changed while the program is running. A constant variable has a global scope, meaning a constant variable can be accessed anywhere in the same program.
Scope and life of a variable
The scope of a variable refers to the availability of the variable through out the program. A variable declared in one file is not necessarily available in another file. Even within the same program, a variable in one function cannot be visible anywhere else in the program. When we declare a variable, it literally comes to life when we execute the program that contains the declared variable. It is up to the programmer whether to use the declared variable or not. The variable will die or its availability will cease to exist once the program ends or its scope expires. Variables declared inside of blocks such as private functions, or subroutines are not visible outside of the block. Consider the following example:
const TAXRATE = .05dim strstr = "A string value." & " TAXRATE " & TAXRATEShowScopesub ShowScope ()dim strstr = "In ShowScope ()" & " TAXRATE " & TAXRATEresponse.write str & "<br>"end subresponse.write str
In this example, we have declared two variables with the same name (str) see lines 2 and 6. On line 3, we assign a string value to this variable. Line 4 calls our subroutine. Inside the ShowScope () subroutine we declare the variable str and assign a value (see lines 6 and 7). Line 8 prints the value of this variable; note the value of this variable would be different than the value assigned outside of the subroutine (see line 3 above). Because the variables inside a block (such as subroutines, functions) have only block-scope, the value of those variables will not be available outside of that block. This is why the print statement on the last line in our code above will print "A string value." & " TAXRATE " & TAXRATE but not "In ShowScope ()" & " TAXRATE " & TAXRATE. The following shows the output of the above code:
In ShowScope () TAXRATE 0.05
A string value. TAXRATE 0.05
Arrays in ASP
The variables make programming more efficient because then a variable can hold any numerical value or result of numerical expression. The variables are great for holding one data value at a time. But what if you wanted to store many similar data type values with a common name? Arrays are the answer and we’ll discuss them next.
What is an array?
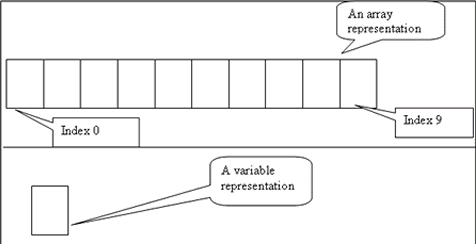
An array is a contiguous space of memory allocated for storing some data. We know when variables are declared, computer’s memory is allocated for them. A similar process takes place when arrays are declared except that size of the memory allocated is greater, depending on the size of the array. Each memory allocation in the array is referred to as a cell or index. If the size of our array is 10, we have 10 different cells. Figure 1 compares a variable declaration with an array declaration. An array index starts from 0 and ends at the size of the array, minus 1. If array’s size is 10, its first index will be 0 and the last index will be 9. We next discuss how to declare and reference arrays with the indices.
How to declare and reference an array?
An array is declared with the keyword DIM and then the array name and then the size of the array in parentheses. Like variables, we do not specify the data type of an array. The following shows the general syntax for declaring an array:
DIM ArrayName(ArraySize)
In the above statement ArrayName is the name of the array and ArraySize is the size of the array. In the following,
DIM strWeekdays(6)
we declare an array called strWeekdays and of size 7. We use the prefix str to clarify that the array is of strings. The array will hold names of days in a week. An array can be initialized in one of two ways. The first method is long because each cell is initialized individually. The second method uses the Array () function to initialize the array.
To understand how to assign or initialize values to an array, you should understand first how to access the values of an array. To access a cell of an array, we use the array name and an index value. A value assigned to a cell of an array is referred to as element. If we want to access the first element of an array, we will use the following syntax: arrayName(0). If we wanted to access the third element, we would use the following syntax: arrayName(2).
Now, we can use the information of how to access an array to initialize an array. If we wanted to initialize a value to the first and third element of an array, we will use the following syntax:
arrayName(0) = value or an expressionarrayName(2) = value or an expression
The first statement above assigns a value to the first element of the array and the second statement assigns a value to the third element of an array. In the following example,
DIM strWeekdays(6)DIM sout, istrWeekdays(0) = "Sunday"strWeekdays(1) = "Monday"strWeekdays(2) = "Tuesday"strWeekdays(3) = "Wednesday"strWeekdays(4) = "Thursday"strWeekdays(5) = "Firday"strWeekdays(6) = "Saturday"for i = 0 to 6
sout = sout & "strWeekdays(" & i & ") = "
sout = sout & strWeekdays(i) & "<br>"nextresponse.write sout
we use an array called strWeekdays and of size 7. On lines 3 through 9, we initialize this array to the days of a week. Then, we use a for loop to print the content of the array. See the following for the output of the above code:
strWeekdays(0) = Sunday
strWeekdays(1) = Monday
strWeekdays(2) = Tuesday
strWeekdays(3) = Wednesday
strWeekdays(4) = Thursday
strWeekdays(5) = Firday
strWeekdays(6) = Saturday
Array () function
An Array () function can be used to initialize values to an array. The following initializes an array without referencing each of the cells in an array of size 3:
arrayName = Array (value1, value2, vlaue3)
The function Array () initializes the each of the values or parameters to the corresponding index. For example, “value1” will be assigned to index 0 and value3 will be assigned to index 2. The following statement initializes our strWeekdays2 array:
strWeekdays2 = Array ("Sunday", "Monday", "Tuesday", "Wednesday",_"Thursday", "Friday", "Saturday")
Note above, we are using “_” (underscore) line continuation character. The line continuation character can be used for long statements. The line continuation character simply means a line is continued on the next line.
Clearly, using array function is much simpler than accessing each of the indices of the array and then assigning a value to the array. Like our previous array example for strWeekdays, Sunday is assigned to index 0, Monday is assigned to index 1,…,Saturday is assigned to index 6. Also note the size of the array strWeekdays2 is 7 and the first index is 0 and the last is 6. When you use the array () function, the size of the array is determined by the number of values passed as argument. In the following, we use the array () function:
DIM strWeekdays2, sout, istrWeekdays2 = Array ("Sunday", "Monday", "Tuesday", "Wednesday",_"Thursday", "Friday", "Saturday")for i = 0 to 6
sout = sout & "strWeekdays2(" & i & ") = "
sout = sout & strWeekdays2(i) & "<br>"nextresponse.write sout
The strWeekdays2 array is initialized above on line 2 and 3. We then use a for loop to print the content of the array. The output is the same as you saw for the strWeekdays array:
strWeekdays2(0) = Sunday
strWeekdays2(1) = Monday
strWeekdays2(2) = Tuesday
strWeekdays2(3) = Wednesday
strWeekdays2(4) = Thursday
strWeekdays2(5) = Friday
strWeekdays2(6) = Saturday
Arithmetic operators in ASP
An operator is simply a method implemented in a programming language to modify, replace, or combine values represented by variables. Without operators, a programming language would not be very useful because the programmer would not be able to store or manipulate the data. The arithmetic operators manipulate numerical values and the assignment operator stores a value to a variable.
Assignment Operator
As the name implies, an assignment operator (or = ) assigns the right hand side expression or a value to a variable on the left hand side. For example, the following
strName = "John Smith"intWeight = 170dtJohnBirthDate = #9/15/1985#
assigns the value “John Smith” to the variable strName. Remember strings are closed inside of double quotation marks. The numerical value 170 is assigned to the variable intWeight. A date variable dtJohnBirthDate is assigned the date value 9/15/1985. The date expression is surrounded by the pound signs to distinguish it from division of 9 divided by 15 and this result then divided by 1985.
The following are examples of an assignment with an expression on the right hand side:
floatAmountDueBeforeTax = intItems * floatCostPerItemstrName = "B" + "o" + "b" + " Smith"intFour = intTwo + intTwo
The variable floatAmountDueBeforeTax is assigned the result of the expression on the right side of the assignment operator. In the context of string expressions, the “+” operator is referred to as the concatenation (or “join”) operator. It simply joins or concatenates the string expressions. The strName is assigned the string “Bob Smith” with “B” + “o” + “b” + ” Smith”. When the “+” operator is used with numerical expressions, it is referred to as the addition operator. This “addition” operator simply adds the numerical expressions on the right hand side of the assignment operator. In intFour = intTwo + intTwo, intFour is assigned the result of adding intTwo to intTwo.
There are a few things to note when using an assignment operator:
- Before assigning a new value to a variable, always make sure that you no longer need the old or the original value.
- When assigning values or calculated expressions, always make sure the left hand side is a variable.
The following
"strName" = "John Smith"70 = 137#1/5/1985# = #9/15/1985#
are not valid assignments because the right side is not a variable.
Arithmetic Operators
The arithmetic operators are also referred to as mathematical operators. The mathematical operators are used to manipulate the values that the variables hold. Each programming language uses different syntax to represent mathematical operators and VBScript is no exception. The most common arithmetic operators include: addition, subtraction, multiplication, division, and modulus.
Addition Operator
The addition operator simply adds one variable or a numerical expression to another variable or a numerical expression. The general syntax of using an addition operator is
intResult = argument + argument
The addition operator has precedence over the assignment operator. That means first the addition will be performed before the assignment takes place. For example,
intFour = (intOne + intOne) + 2
the variable intOne (it is assumed numerical value is 1) is added first to intOne and then to intFour; then, this result is added to 2. Although the use of parenthesis is not necessary in the statement, their use helps to clarify the precedence or order of execution. The final result (or the number 4) is assigned to the variable intFour by the assignment operator.
Let’s do an example that prints different sizes of text using the heading tag with the addition operator:
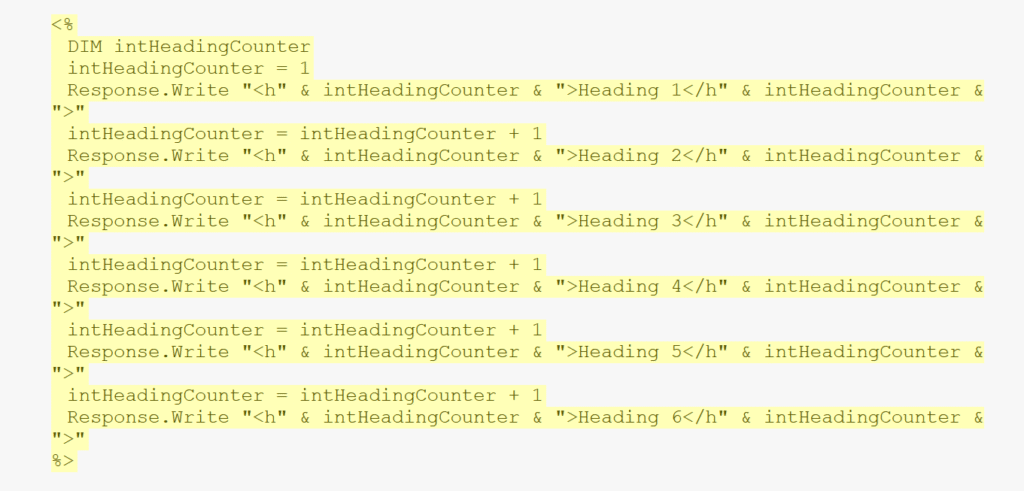
In this example, we use the addition operator to print the text in different sizes. We start by declaring a variable called intHeadingCounter and then we initialize it to 1 by using the assignment operator. We next print Heading 1 using the <h1> tag:
“<h” & intHeadingCounter & “>Heading 1</h” & intHeadingCounter & “>”
is equivalent to
<h1>Heading 1</h1>
The ampersand (&) with the response.write object joins our strings or HTML tags. To print heading level 2, we add one to intHeadingCounter and then print again with response.write but this time we use <h2> instead of <h1>. After adding 1 each time a different heading is printed, the remaining code prints the heading 3, 4, 5, and 6. The following shows the output of the code:

Subtraction operator
With the subtraction operator (or “-“), you can subtract one argument from another. Unlike addition operator, the subtraction operator can produce different results depending on the order of arguments. For instance,
intTwelve = 5 + 7intTwelve = 7 + 5
is 12. However, if you change arguments when you use the subtraction operator, the result can be different. For example,
intPositiveTwo = 7 - 5intNegativeTwo = 5 - 7
in both statements we use the same numerical values and the same operator yet the result is different.
Multiplication operator
The multiplication operator can be used to multiply one numerical value with another. The symbol for multiplication in VBScript is the asterisk (“*”). The following
intThirtyFive = 7 * 5
multiplies 7 with 5 and assigns the result (or 35) to the variable intThirtyFive. Because multiplication has higher precedence than addition and subtraction, use of parentheses can enforce the order of execution. For example,
intTwenty = 5 * 2 + 10intSixty = 5 * (2 + 10)
the variable intTwenty is assigned the value 20 because multiplication is performed first (5 * 2 = 10) and addition is performed next (10 + 10). In the second statement, the addition is performed first, resulting in 12 and then multiplication with 5; produces 60.
Division operator
VBScript has two divisions: integer and float. For each of these operations, a different symbol is used. For integer division, the backslash (“\”) is used. For example,
intFive = 10 \ 2intZero = 0 \ 10intFour = 9 \ 2
each of these expressions returns an integer value. The integer division rounds down a floating number. For example, the 9 \ 2 produces 4; similarly, 1 \ 3 produces 0.
For those expressions that require the fractional part, the float division operator (the forward slash: “/”) should be used. For example,
floatFourAndHalf = 9 / 2floatResult = 10 / 3
each of these expressions returns the fractional part of the resulting value. When working with floats, the Round function can be used to obtain a specific number of decimal places. Depending on the system, the value of floatResult above can vary. To round a floating point number to 2 decimal places, use Round (.333333333333333, 2), this will return .33.
When working with division, be careful not to divide by zero because this is undefined and will cause an error. When there are number of division operators used in an expression, the division starts from right to left. The division and multiplication have the same degree of precedence. When these both operators are used in an expression, the expression is evaluated from left to right.
Modulus operator
The division can return an integer or a floating-point value, what about the remainder? The modulus operator returns the remainder after division. The keyword “MOD” operator is used to return the remainder. For example,
9 MOD 2 returns 115 MOD 4 returns 30 MOD 4 returns 44 MOD 2 returns 0
Operator precedence
To correctly formulate expressions, it is very important to learn the order of operator execution. The following examples emphasize the need for understanding the order of execution:
4 + 2 * 3 = ?2 + 2 * 3 - 1 \ 1 + 4 = ?
In the first statement, the answer is 10 (2 * 3 = 6 + 4 = 10) not 18 (4 + 2 = 6 * 3 = 18). Because multiplication and division has precedence over addition and subtraction, 2 is first multiplied with 3 and then the result is added to 4. For clarification, the statement can be rewritten exactly as it is executed as 4 + (2 * 3) = 10. Because parentheses have the highest order of precedence, they are executed first.
What is evaluated first when both division and multiplication operators are used in a statement, as in second statement? The answer depends on the location of their placements in a statement. When more than one of or more of multiplication or division operators are used, the execution begins from right to left. In comparison, both addition and subtraction operators are evaluated from left to right in the order they are used.
Let’s do the second statement step by step:
1 \ 1 = 1 (because division has the highest precedence and execution is began from right)2 * 3 = 6 (next multiplication has precedence over other operators)Now the original equation can be represented with substitution of the above calculations:2 + 6 - 1 + 4 = ?Finally, we execute the above statement from right to left and obtain 11
The second statement can be rewritten exactly the way it is executed: 2 + (2 * 3) – (1 \ 1) + 4 = 11. Again, code inside the parenthesis is executed first.
Let’s verify our results by coding our examples in VBScript:
<%
Response.Write "4 + 2 * 3 = " & 4 + 2 * 3
Response.Write "
2 + 2 * 3 - 1 \ 1 + 4 = " & 2 + 2 * 3 - 1 \ 1 + 4
%>
We use a response.write statement to print the result of each expression. As the following output shows:
4 + 2 * 3 = 10
2 + 2 * 3 – 1 \ 1 + 4 = 11
the first expression equals 10 and the second expression equals 11, as we expected.
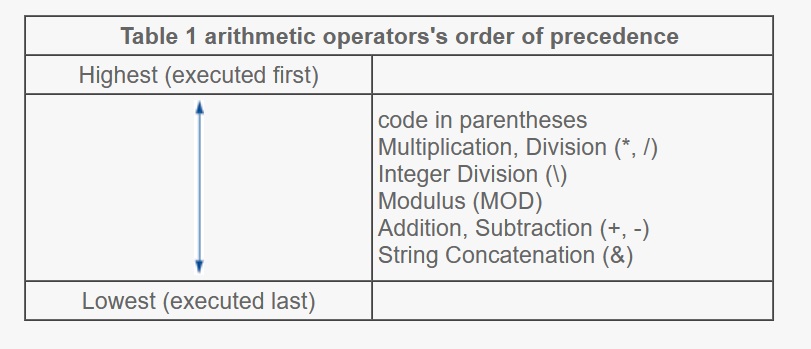
Table 1 summarizes order of precedence for the arithmetic operators shown above.
Decision making
It is rare to write a program that does not change the normal flow of the program. Programs use control structures such as condition checking, looping, and branch logic to change the normal flow of the program. A control structure simply refers to the flow of the execution of the program.
A program can execute in one of two ways: in a linear or non linear fashion. Linear or sequential execution refers to the execution of the statements in the order they are listed. In comparison, the non-linear execution refers to the execution of statements regardless of the order they are listed.
As shown in figure 1, statement 1 is executed before statement 2 in a linear execution. In other words, statements are executed in the order they are listed. However, in a non-linear execution, as the figure shows, statement 2 is executed after statement 3 even though statement 2 is written before statement 3. See figure 1.
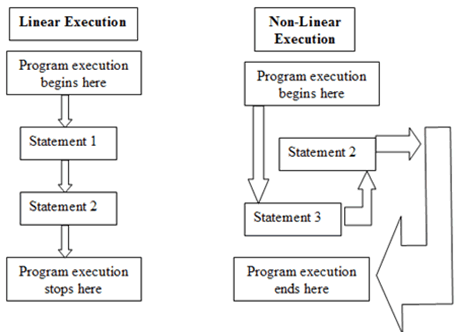
By controlling the flow of the program, you can have your program precisely decide if and when what code will execute. (Visit corresponding pages for looping and branching control structures. This page covers only condition checking.) Your program makes decisions on what code to execute based on the result of conditional logic. The conditional logic structure refers to the process of checking conditions. If a condition is met, then, some code is executed. If, however, a condition is not met, then, some other part of the program is executed. For example, you may decide you need a raincoat if it is raining. In this case, our condition is “if it is raining.” If this condition is satisfied, then, you decide you need a raincoat. See figure 2.

Depending on the condition(s) you want to check, you may employ any one or more of these conditional logic options:
- simple IF statement,
- if/else structure,
- nested if statements,
- elseif, or
- select case
Constructing IF statements
If you have ever done any programming, you probably be familiar with constructing a simple if statement because it is one of the most common programming control structures used. If you do not have programming experience or are new to ASP, this page will show you how to get started with constructing IF statements in ASP. In the context of programming, constructing of conditions involves conditional expression (or simply one or more conditions), and an action, if any.
Whether or not you have realized, in our daily lives we use if statements all the times. For example, you may say if I am thirsty, I want to drink a glass of water. Our condition in this case is “if I am thirsty.” The action is drinking glass of water. Notice here our action is dependent on the satisfaction of the condition. Similarly, the action that our program will perform will depend on the outcome of the conditional expression. A conditional expression simply evaluates either to true (condition being met) or false (condition is not met).
Fortunately, constructing conditions in ASP using VBScript is very straight forward process because it uses English language like words. The following shows the general syntax for constructing an IF statement:
IF condition(s) THEN
ASP Statement(s)END IF
The IF, THEN, and END IF are all keywords of VBScript in ASP. One or more conditions are placed after the keyword IF. If more than one condition is used, a logical operator (i.e., AND, OR, or NOT) must be used to connect the conditions. After the condition, the keyword THEN must be used to end the listing of condition(s) and to list the statements that need to be processed if the condition is met. The END IF keyword indicates the end of an IF..THEN block.
Let’s do a simple example of finding an even number. If a number is divisible by 2 and the remainder is 0, then it is an even number. Because 2, 4, 6, 8, and 10 are all divisible by 2 and their remainder is 0, these are even numbers. A MOD operator can be used to test the condition that if a number is even. A MOD operator returns the remainder of two numbers. We can test for an even number by using an IF..THEN statement:
IF intAnyNumber MOD 2 = 0 THEN
response.write intAnyNumber & " is an even number"END IF
In this example, we constructed a condition that checks if a number (or the value of the variable intAnyNumber) is even. If the number is even, we print out a message saying the number is even. If the number is not even (in other words, if the condition is not met), the response.write statement is not executed. Consequently, nothing will be printed to the screen. The following illustration summarizes this example:
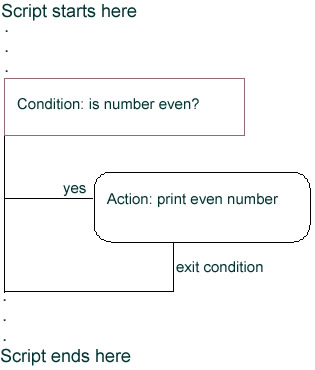
In the following program we determine if the number 100 is even using a condition similar to what we used above:
<%
DIM intOneHundred
intOneHundred = 100
IF intOneHundred MOD 2 = 0 THEN
response.write intOneHundred & " is an even number"
END IF%>
In this example, we start by declaring a variable called intOneHundred. In the next line, we assign the value 100 to intOneHundred, using the assignment operator. Next, we write an IF statement to check if the result of the MOD operator equals 0. If the result of this operation is 0, then, the number, in this case 100, must be an even. If our IF statement is satisfied, then, we print a message indicating 100 is even. The END IF statement ends the IF condition. What would be the result of this program? Because 100 is divisible by 2, our IF condition will be satisfied, as shown here:
100 is an even numberIf it helps, you may start constructing a condition in words before writing the actual programming code:
If (number is even) then
Print number is evenEnd if
That may also be helpful if you have to write complex conditions. Because an IF..THEN statement is a most commonly used conditional logic structure, it is worth understanding how it constructed and how it works.
Using IF/ELSE structure
An IF/ELSE block can be used when you want to execute some code when a condition is true and some other code when the condition is false. The IF…THEN…ELSE block is used for testing for two possible outcomes of a condition. In other words, by adding an else clause to the simple IF statement you add an alternative action if the condition is not met. If the condition is met, statement(s) inside an ELSE clause is not executed.
To execute some code when the condition is false, we need to use an ELSE clause. An ELSE clause cannot be used alone; it must be used with an IF statement. The following is the general syntax for an IF/ELSE structure:
IF condition(s) THEN
ASP Statement(s) for when the condition is metELSE
ASP Statement(s) for when the condition is NOT metEND IF
Analysis of the above code should point out that either:
- the statements immediately below the condition (after/below THEN) but before ELSE will be executed, OR
- the statements below ELSE and before END IF will be executed.
Consider the following IF/THEN/ELSE structure as an example:
dim intGradeintGrade = 50IF intGrade >= 70 THEN
response.write "Passing grade."ELSE
response.write "Failing grade."END IF
In this example, we start by declaring a variable called intGrade and we next initialize it to the numerical value of 50. Next, we check if the value of this variable is greater than or equal to 70 with the statement IF intGrade >= 70 THEN. Because 50 is not greater than or equal to 70, the condition is not satisfied. Therefore, only the statement inside the ELSE clause will be executed. Our ELSE clause simply contains a print out statement: “Failing grade.” So “Failing grade.” will be printed to the screen. If, however, the value of intGrade is 72 (or higher or just 70) in the same example, then, the before statement after THEN and before ELSE is executed, specifically, the message “Passing grade.” The following shows graphically of what is happening when using an IF/ELSE structure:
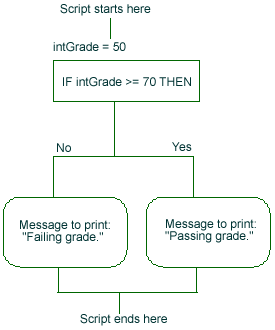
As is depicted in the illustration above, one of the two possible messages will be printed. Either “Passing grade.” or “Failing grade.” will be printed once the script is executed.
The following example shows what happens when the condition is met inside your IF/ELSE structure:
Dim intEvenTestDim intEvenTest = 94IF intEvenTest MOD 2 = 0 THEN
response.write intEvenTest & " is an even number"ELSE
response.write intEvenTest & " is an odd number"END IF
In this example we are testing if the number 94 is even or odd. Our IF intEvenTest MOD 2 = 0 THEN statement uses the MOD operator to compute the remainder after dividing 94 by 2. If this operator returns 0, then we know it is an even number. Otherwise, the number is odd. Because the MOD operator will return 0 when 94 is divided by 2, our condition is satisfied. Therefore, “94 is an even number” will be printed. Had the number been odd, the statement inside the ELSE clause would have been executed.
Again, the code inside the IF statement is executed only if the condition is true. If the condition is false and if you are using an ELSE clause, then, the code inside the ELSE clause is executed. In the following if intAnyNumber is 3, then
IF intAnyNumber MOD 2 = 0 THEN
response.write intAnyNumber & " is an even number"ELSE
response.write intAnyNumber & " is an odd number"END IF
“3 is an odd number” is displayed because 3 MOD 2 is not equal to 0.
Instead of having an ELSE clause, we could use two separate IF…THEN clauses for evaluating each condition. Suppose intAnyNumber is 3, the following example provides the same results but notice no ELSE clause is used:
IF intAnyNumber MOD 2 = 0 THEN
response.write intAnyNumber & " is an even number"END IFIF intAnyNumber MOD 2 <> 0 THEN
response.write intAnyNumber & " is an odd number"END IF
However, performance-wise it is not efficient because two conditions will be checked instead of one. If you have multiple conditions to check, which is normally what happens in a real web application, it is not suggested to use separate simple IF structures for each possible condition. When possible, try testing all possible conditions with as few IF statements as possible. For example, avoid:
dim intGrade2intGrade2 = 0IF intGrade2 >= 70 THEN
response.write "Passing grade."END IFIF intGrade2 < 69 THEN
response.write "Failing grade."END IFIF intGrade2 < 68 THEN
response.write "Failing grade."END IF...IF intGrade2 < 1 THEN
response.write "Failing grade."END IF
Nesting if statements
Situations arise when you have to use nested IF structure. Nested structures simply contain other IF structures. You can easily nest IF structures if you already know how to create an IF structure. Here is an example:

The following shows a graphical representation of the above nested IF structure example:
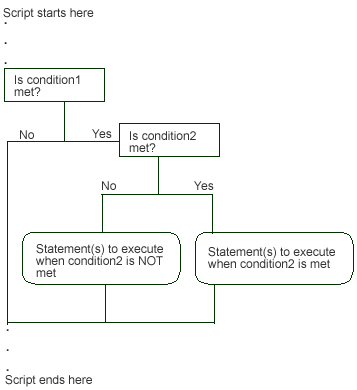
In the following example, we print a message based on a student’s grade:
<%
dim iGrade
iGrade = 84
if iGrade < 101 then
if iGrade = 100 then
response.Write "Super! You have 100%!!!"
end if
if iGrade < 100 then
if iGrade > 95 then
response.Write "Excellent work! Your score is between 95-99.!!!"
else
if iGrade > 90 then
response.Write "Great work! Your score is between 90-95.!!!"
else
response.Write "Your score is below 90!"
end if
end if
end if
else
response.Write "Terrific! You have over 100%!!"
end if%>
Let’s analyze this script in detail. (Remember to substitute 84 for iGrade as you follow this script.) We start by declaring a variable iGrade and we assign the numerical value 84 to this variable. The next statement is our main IF statement that checks if iGrade value is 101 or less. If iGrade is less than 101, then, we check at least one more condition. In words, we are saying process the nested IF statements if iGrade is not over 100. If iGrade is over 100, then, nested IF statements are not executed; rather ELSE clause is executed that would print: “Terrific! You have over 100%!!”.
Because iGrade is 84 and as we stated earlier, at least one of the nested IF statements will be executed. (With a quick inspection of this code, you may realize that most of the nested IF statements will be checked. You may also realize that we could have used logical expressions to combine some of these conditions. The script is purposely written this way to conveniently just show how to construct nested IF statements.)
Our first nested IF statement, if iGrade = 100 then, checks if iGrade is equal to 100. We know it is not. Consequently, this condition is not satisfied.
The second condition, if iGrade < 100 then, checks if iGrade is less 100. Because iGrade is less than 100, this condition is satisfied. This IF structure, as you may have noticed, also contains sub nested IF structures. Our first sub nested IF structure, if iGrade > 95 then, tests if iGrade is greater than 95. Because 84 is not greater than 95, the ELSE clause of this IF structure is executed. In the ELSE clause, we have one more IF structure, if iGrade > 90 then, testing if iGrade is greater than 90. Because this condition is not satisfied, the statement inside the ELSE clause, response.Write "Your score is below 90!", will be executed.
The following output verifies our analysis:
Your score is below 90!
For your convenience, a graphical version of the above example is also shown in figure 1 below. A closer inspection of this graphic reveals that your answer should be the same as shown above. A “No” in the graphic indicates an IF structure condition is not satisfied; in contrast, a “Yes” indicates the condition is satisfied. In this example, following IF structure conditions are satisfied:
Is iGrade < 101?Is iGrade < 100?
The following IF structure conditions are not satisifed:
Is iGrade = 100?Is iGrade > 95?Is iGrade > 90?
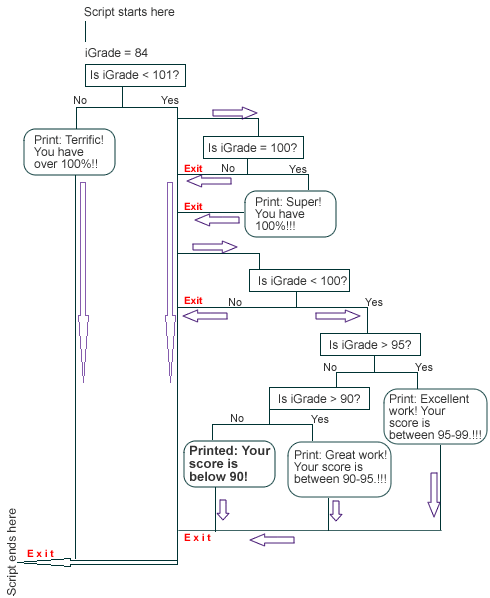
Keep the following points in mind when working with nested IF/ELSE structures. Make sure to properly end your condition with a corresponding END IF statement. Otherwise, you are likely to find your script does not behave the way you intended. Also, an ELSE clause can only be used with an IF structure. You can not use an ELSE clause without an IF structure.
Using elseif
The IF…THEN…ELSE block is used for testing for two possible outcomes of a condition. The ELSEIF structure is used to test for multiple outcomes. The syntax for an ELSEIF clause is very similar to an IF….THEN structure, as shown in table 1.
| Table 1 comparison of IF…THEN and ELSEIF…THEN structures | |
|---|---|
| IF…THEN | IF intAnyNumber MOD 2 = 0 thenresponse.write intAnyNumber & " is an even number"END IFIF intAnyNumber MOD 2 <> 0 thenresponse.write intAnyNumber & " is an odd number"END IF |
| ELSEIF…THEN | IF intAnyNumber MOD 2 = 0 thenresponse.write intAnyNumber & " is an even number"ELSEIF intAnyNumber MOD 2 <> 0 thenresponse.write intAnyNumber & " is an odd number"END IF |
Notice in table 1 for the ELSEIF structure only one END IF is needed because we only have one IF…THEN structure. An ELSEIF structure does not need an END IF. END IF is used only for ending an IF statement. Why do we need an ELSEIF structure when it is so identical to an IF…THEN structure? These structures may appear identical; however, the difference is in the way they are evaluated. In the case of an ELSEIF structure, once a condition is met all other conditions are not evaluated. In the case of multiple IF…THEN structures each structure will be evaluated.
Let’s work with an example to make this distinction. Suppose we want to determine the letter-grade based on a given numerical score. We can assume that 90-100 is an “A”, 80-89 is a “B”, 70-79 is a “C”, 60-69 is a “D”, and below 60 is an “F”. Table 2 presents the code for the IF…THEN structure and the ELSEIF structure.
| Table 2 determining the letter grade with IF…THEN and ELSEIF…THEN structure | |
|---|---|
| IF…THEN structure | IF intScore >= 90 AND intScore < 100 thenresponse.write "You have an A"END IFIF intScore >= 80 AND intScore < 90 thenresponse.write "You have a B"END IFIF intScore >= 70 AND intScore < 80 thenresponse.write "You have a C"END IFIF intScore >= 60 AND intScore < 70 thenresponse.write "You have a D"END IFIF intScore < 60 thenresponse.write "You have an F"END IF |
| ELSEIF…THEN structure | IF intScore >= 90 AND intScore < 100 thenresponse.write "You have an A"ELSEIF intScore >= 80 AND intScore < 90 thenresponse.write "You have a B"ELSEIF intScore >= 70 AND intScore < 80 thenresponse.write "You have a C"ELSEIF intScore >= 60 AND intScore < 70 thenresponse.write "You have a D"ELSEIF intScore < 60 thenresponse.write "You have an F"END IF |
Again, an ELSEIF structure has only one ENDIF in table 2. Let’s evaluate each of the structure with intScore = 70. In the IF….THEN structure presented in table 2, the first condition is false because intScore is not greater than 90 or less than 100. The next IF…THEN condition is also evaluated to be false because intScore is not greater than 80 or less than 90. The third condition is evaluated to be true because intScore is 70. The next two IF…THEN structures are also checked and each is evaluated to be false.
In comparison, in an ELSEIF structure once a condition is matched remaining conditions, if any, are not checked. Assume again intScore = 70, in the ELSEIF structure, the first, second and third conditions will be checked (as shown in table 2). The fourth and fifth conditions are skipped, however.
Let’s do one more example with a different intScore value. If intScore was 90, all the IF…THEN conditions shown in table 2 will be checked. However, in the ELSEIF structure only the first condition would be checked because the first condition is true and the remaining condition will be skipped! Although the performance of these two structures is negligible in this small example, it may become a big performance issue for a complex project that has hundreds or even more possible outcomes. In summary, for performance and for brevity, consider using the ELSEIF structure over individually separated IF…THEN structures.
Select case statements
Instead of using an ELSE…IF structure, you can use a select case statement to execute one statement among many alternatives. The basic idea behind using a select statement is to give an expression to evaluate and several different statements to execute based on the value of the expression. Each case in a select statement is checked against value of the expression until a match is found. Once a match is found, the execution of the select case statement ends. If no match is found, a default case, if specified, is executed. The basic syntax for a select case statement is:
Select case expression
Case value1
code to execute when a value1 equals expression
Case value2
code to execute when a value2 equals expression
Case value3
code to execute when a value3 equals expression
...
Case valueN
code to execute when a valueN equals expression
Case else
code to execute when a no match is found among the choices listed above
Let’s start with an example that shows how to use the select case statement:
dim result, soutfor i = 1 to 10
result = i mod 2
select case result
case 0
sout = sout & i & " is even<br>"
case 1
sout = sout & i & " is odd<br>"
end selectnextresponse.write sout
In this example we use a for loop to iterate the variable i from 1 through 10. With each value for i, we determine if the value is divisible by 2. On line 4, we start our select case statement and our expression is the value of result. The value of result is going to be either 0 or 1. As the loop and select case statement executes, the value of result will be checked with 0, and 1; see lines 5 and 7, respectively. The following shows the output of the above code:
1 is odd
2 is even
3 is odd
4 is even
5 is odd
6 is even
7 is odd
8 is even
9 is odd
10 is even
Relational operators
A conditional statement uses conditional logic to determine what programming statements to execute. By using some conditional logic (a process of checking conditions), we determine if a certain condition is true or false. If the condition is true, we execute some part of the program. Otherwise, if the condition is false, we use some other part of the program.
To write a conditional statement, we need to use a relational operator supported in ASP. ASP also supports logical operators to create complex conditions.
Before you can construct conditional statements in ASP, you should first understand the relational operators available in ASP. The Relational operators are used for comparison of the value of one element with another. There are six types of relational operators: equal, greater than, less than, greater than or equal to, less than or equal to, and not equal to. Each of these operators can be used to compare the values of the variables. The result of each of these operators is either true or false. When using these operators, make sure all of the arguments are of same data type. Integers should be compared with integers, strings with strings, and so on. Table 1 reviews each of these operators.
| Table 1 Relational operators | ||
|---|---|---|
| Operator Name | Symbol | Description |
| Equal | = | Returns true if both sides are equal. |
| Greater than | > | Returns true if the variable on the left is greater than the variable on the right. |
| Less than | < | Returns true if the variable on the left is less than the variable on the right. |
| Greater than or equal to | >= | Returns true if the variable on the left is greater than or equal to the value of the variable on the right |
| Less than or equal to | <= | Returns true if the variable on the left is less than or equal to the value of the variable on the right |
| Not equal to | <> | Returns true if both sides are not equal. |
Table 2 shows truth table with examples for each of the relational operator. As the table shows, the A is set to 20 and B is set to 15. When we check equality with the equal operator, both sides must be equal or same for the expression to be true. Because the 20 is not equal to 15, the A = B is false. In the second example in the table, we check if A > B. In this case, the expression is true because 20 is greater than 15. Using similar logic, the table shows results for other relation operators.
| Table 2 truth table for relational operators | ||||
|---|---|---|---|---|
| Operator Symbol | Example (Assume A = 20, B = 15) | True when | False when | Result |
| = | A = B | A and B are same or equal | A and B are different | False |
| > | A > B | A is greater than B | A is not greater than B | True |
| < | A < B | A is less than B | A is not less than B | False |
| >= | A >= B | A is greater than or equal to B | B is greater than A | True |
| <= | A <= B | A is less than or equal to B | B is less than A | False |
| <> | A <> B | A is not equal to B | A and B are same or equal | True |
Logical operators
The logical operators are used for Boolean expressions. A Boolean expression can be in one of two states: True or False. Depending on the state of the expression, different set of code can be executed. Checking the state of a variable is involves condition constructing.
The two basic types of logical operators are: AND, and OR. A condition joined with the AND operator is true only when all of the expression(s) in a statement is true. For example, the following expression
(4 > 2) AND (3 > 1)
is evaluated as true because 4 is greater than 2 and 3 is greater than 1. If either one or more of the conditions joined with an AND operator is false, then the entire expression is false. Consider this expression
(4 > 5) AND (3 > 2)
is evaluated to be false because 4 is not greater than 5. Notice the other condition, 3 greater than 2, is true. As stated earlier, both of the conditions have to be true for a statement to be evaluated as true. Table 1 presents the AND operator truth table, which shows that an expression is true only when both A and B are true; otherwise false.
| Table 1 truth table for AND operator | ||
|---|---|---|
| A | B | A AND B |
| TRUE | TRUE | TRUE |
| TRUE | FALSE | FALSE |
| FALSE | TRUE | FALSE |
| FALSE | FALSE | FALSE |
In comparison, an OR operator is true when at least one of the conditions of an expression is true. The following two statements
(4 < 2) OR (3 > 2)(15 < 70) OR (13 >= 2)
are true. In the first statement, the second condition is true: 3 is greater than 2. Therefore, the entire expression is evaluated to be true even though the first condition is false: 4 less than 2. In the second statement, both conditions are true; therefore, the entire expression is evaluated to be true.
Table 2 presents the truth table for the OR operator. As the table indicates, the expression is false only when both of the conditions are false. When at least one of the conditions is true, the resulting expression is true.
| Table 2 truth table for OR operator | ||
|---|---|---|
| A | B | A OR B |
| TRUE | TRUE | TRUE |
| TRUE | FALSE | TRUE |
| FALSE | TRUE | TRUE |
| FALSE | FALSE | FALSE |
Looping controls
If we want to execute our statements more than once, should we write our statements as many times we need to execute them? No, rather use a looping structure.
What is looping?
A looping is a control structure that executes statements multiple times. Looping is a way of executing statements more than time. On this web page, you will learn the DO…LOOP and the FOR…LOOP.
DO…LOOP
The DO.LOOP has two forms. The notable distinction between the two is testing of the loop condition (see the condition logic section to learn how to construct conditions using relational operators). In the first loop that we will discuss has the condition checked first. The syntax for this DO…WHILE…LOOP is
DO WHILE expression
StatementsLOOP
The DO, WHILE, and LOOP are the keywords of VBScript. The loop starts with the keyword DO. After the WHILE keyword condition(s) is listed. The condition controls the number of times the loop will be executed. Then, statements or code we want to execute are listed after the condition and before the keyword LOOP. The keyword LOOP begins the execution of loop.
Let’s start with an example that will print numbers 1 through 5 with a DO…WHILE loop:
DIM intCounterintCounter = 1Do while (intCounter <= 5)
Response.write intCounter & " "
intCounter = intCounter + 1Loop
The first line above declares a variable called intCounter. The second line sets the value of this variable to 1. The third line says check the value of intCounter; if the value is less than or equal to 5, then, execute the code inside the loop. We have two statements inside the loop. The Response.write intCounter & ” ” statement prints the current value of intCounter. The intCounter = intCounter + 1 statement adds 1 to intCounter, each time the loop is executed. To sum up, we start intCounter with 1 and each time we print the value of intCounter inside the loop, the value of intCounter is updated by 1. The value of intCounter will reach 5 after the code inside the loop has executed five times. When the value of intCounter becomes 6, the loop will stop to execute.
The following code shows the output of the above code:
1 2 3 4 5
In the above loop example the condition is tested first. This means if the condition fails, then, statements inside the loop will not be executed. The second form of the DO…LOOP guarantees that statements of the loop will be executed at least once. This loop has the following form:
DO
StatementsLOOP WHILE condition
This version is very similar to the first version of the previously mentioned DO…WHILE loop except that statements are listed first before the condition. Thus the statements will executed at least once before the condition the checked. Let’s do the top example with the DO…LOOP to print number 1 through 5:
DIM intCounterintCounter = 1Do
Response.write intCounter & " "
intCounter = intCounter + 1Loop while (intCounter <= 5)
For…Next
The FOR…NEXT loop is slightly coded differently than DO…WHILE loop. The syntax for the FOR…NEXT loop is:
FOR counter_variable = start_value TO stop_value STEP step_value
StatementsNEXT
The FOR loop always starts with an initial or starting value. After the keyword TO, the stopping value is listed. The stopping value determines when the loop will stop. Then, after the keyword STEP iteration value is listed. This is the value that determines by what value the loop counter variable is updated. Note that the default step value is 1, which means the loop will iterate by 1 if step and the step_value are omitted. Then, the statements that need to be executed inside the loop are listed after the FOR loop statement and before the LOOP keyword. And, the keyword NEXT continues the loop to the next iteration. The statements inside a loop is referred to as loop body. The following code prints numbers from 1 through 5:
for intCounter = 1 to 5
Response.write intCounter & " "next
So how and by how much is our intCounter variable updated above, as the loop executes? Again, if you don’t use the STEP keyword to specify the update value, the default update value is 1. So our loop will execute five times, printing 1 2 3 4 5 .
In our next example, we print add and even numbers between -5 and 100:
FOR intCounter = -5 to 100 STEP 10
IF intCounter MOD 2 = 0 then
Response.write intCounter & " is an even number" & "<br>"
ELSE
Response.write intCounter & " is an odd number" & "<br>"
END IF intCounter = intCounter + 1NEXT
In this example, we set intCounter to a negative number, -5. We iterate intCounter to 100 by 10, each time the loop executes. On line 2, we check if the value of intCounter is even by using the MOD operator. If it is, the statement response.write intCounter & ” is an even number” & “<br>” is executed to print current value of intCounter. If the MOD operator determines that the current value of intCounter is an odd number, we execute the response.write statement inside the ELSE clause. The line intCounter = intCounter + 1 makes sure that each time the loop execute we add 1 to intCounter. Thus the value of intCounter is iterated by 11 (10 + 1) each time the loop executes.
Assuming we make no other change to this loop except we delete the last line (intCounter = intCounter + 1), our loop will print odd numbers (-5, 5, 15, 25, etc.). To avoid printing just odd numbers, we add 1 to our intCounter (resulting in -5, 6, 17, 28, etc.). See the output below:
-5 is an odd number
6 is an even number
17 is an odd number
28 is an even number
39 is an odd number
50 is an even number
61 is an odd number
72 is an even number
83 is an odd number
94 is an even number
Infinite loops
If the condition of the loop is not ever met, the loop executes indefinitely. This is why the loop must be properly initialized and iterated to reach the terminating condition value. The following shows an example of an infinite loop:
FOR intCounter = 1 TO 10 STEP -2
response.write intCounter & " is <br>"NEXT
In this example intCounter is set to 1 and is being subtracted by -2 each time the loop is executed. Thus condition will never be satisfied and the loop will iterate indefinitely.
Nesting Loops
Loops can be nested; meaning one or more loops can be placed inside of another loop. Assuming that your nested loops are constructed properly, the loops will execute in the order they are listed. Assume we have one loop inside of another. The execution of the loop will start with the outer loop; next the inner loop will be executed from the starting value to the finish value. Then, the outer loop will execute again if the outer loop stop value is not yet reached. The inner loop will execute again from start to finish. In other words, each time the outer loop executes once, the inner loop executes completely from the starting to the finish value. The following example uses two FOR loops to print a multiplication table:
dim strOutstrOut = "<table width=""100"" border=""1"" cellpadding=""2"">"for row = 1 to 10
strOut = strOut & "<tr align=""center"">"
for col = 1 to 10
strOut = strOut & "<td>" & row * col & "</td>"
next
strOut = strOut & "</tr>"nextstrOut = strOut & "</table>"response.write strOut
To properly align our multiplication table, we use HTML table. In the above code, our first FOR loop (or the outer loop), creates the rows for our table. The second FOR loop creates each column for our row. On line 6 of our code, we multiply the value of row with the value of column and assign the result to the variable strOut. The first time the outer loop executes, it executes with the value 1. The inner loop also start with 1 and goes up to 10. Thus, each time the inner loop executes 1 (the value of the variable row) is multiplied to the value of column (which starts with 1 and goes to 10); resulting in:
1 * 1 = 1
1 * 2 = 2
1 * 3 = 3
.
.
.
1 * 10 = 10
The following shows the output after the first loop has executed once the second loop has executed completely:
| 1 | 2 | 3 | 4 | 5 | 6 | 7 | 8 | 9 | 10 |
Similarly, remaining table is constructed as the outer loop moves across and the inner loop move down resulting in:
| 1 | 2 | 3 | 4 | 5 | 6 | 7 | 8 | 9 | 10 |
| 2 | 4 | 6 | 8 | 10 | 12 | 14 | 16 | 18 | 20 |
| 3 | 6 | 9 | 12 | 15 | 18 | 21 | 24 | 27 | 30 |
| 4 | 8 | 12 | 16 | 20 | 24 | 28 | 32 | 36 | 40 |
| 5 | 10 | 15 | 20 | 25 | 30 | 35 | 40 | 45 | 50 |
| 6 | 12 | 18 | 24 | 30 | 36 | 42 | 48 | 54 | 60 |
| 7 | 14 | 21 | 28 | 35 | 42 | 49 | 56 | 63 | 70 |
| 8 | 16 | 24 | 32 | 40 | 48 | 56 | 64 | 72 | 80 |
| 9 | 18 | 27 | 36 | 45 | 54 | 63 | 72 | 81 | 90 |
| 10 | 20 | 30 | 40 | 50 | 60 | 70 | 80 | 90 | 100 |
Branch logic controls
The branch logic control refers to the process of leaving the current flow of the program to a new set of instructions. There are two types of branching logic controls: subroutines and functions. The subroutines perform actions and functions compute values. We first start with subroutines.
Using Subroutines
Subroutines are used to perform an action. An example of action might be to print a message to the screen. A subroutine starts with the keyword SUB then a meaningful and descriptive name. Next, code is written inside the subroutine before ending it with the keywords END SUB. The following shows the general syntax for creating a subroutine:
SUB SubName
StatementsEND SUB
Consider the following subroutine:
SUB PrintMessage
response.write "in subroutine<br>"END SUB
The SUB PrintMessage creates a subroutine called PrintMessage. The PrintMessage subroutine prints a message (see line 2). To print the message (or to execute code inside of any other subroutine), we have to call the subroutine. To “call” or start the code inside the subroutine, we simply write the name of the subroutine and the flow of the control goes to that subroutine. If applicable, you can also pass values to a subroutine when calling. In the following
SUB PrintMessage
response.write "in subroutine<br>"END SUBresponse.write "Calling subroutine<br>"PrintMessageresponse.write "done calling"
the PrintMessage subroutine is called by line 5 and the subroutine prints the message “in subroutine” (see line 2). After the subroutine ends (line 3), line 6 executed. See the following output of the above code:
Calling subroutine
in subroutine
done calling
Argument passing
Arguments or variables can be passed to subroutines. The following subroutine, for example, takes one argument:
SUB PrintMessage (strMsg)
response.write strMsgEND SUBPrintMessage ("Passing a string argument to the PrintMessage subroutine.")
The PrintMessage subroutine above takes one argument, strMsg. We pass the string argument when we call the PrintMessage subroutine on line 4.
You can also pass more than one argument by separating the arguments by a comma. When you pass argument(s) to a subroutine make sure the order and type of arguments is correct. For instance, if your subroutine expects three arguments as such that the first argument needs to be date, the second as string, the third as an integer, make sure that your first argument is date, the second a string, and third an integer value.
In the following
PrintMessage strMessage, numOfTimesToPrint
we pass two arguments to a subroutine named PrintMessage. The first argument is a string and the second argument is an integer, as shown below:
SUB PrintMessage (strMsg, numPrint) for i = 0 to numPrint
response.write strMsg & "<br>"
nextEND SUBdim strMessage, numOfTimesToPrintstrMessage = "Argument passing to a subroutine."numOfTimesToPrint = 5PrintMessage strMessage, numOfTimesToPrint
This subroutine prints “Argument passing to a subroutine.” 5 times with a for loop (see lines 2 through 4). The following shows the output of the above code:
Argument passing to a subroutine.
Argument passing to a subroutine.
Argument passing to a subroutine.
Argument passing to a subroutine.
Argument passing to a subroutine.
Argument passing to a subroutine.
Using functions
Functions are written to perform calculations. Like subroutines, functions can take one or more arguments. Functions can also return one value. A function begins with the keyword FUNCTION and ends with the keyword END FUNCTION. The following shows the general syntax for defining a function:
FUNCTION functionName
StatementsEND FUNCTION
As an example, we will write a function that will return a positive number if we pass a negative number. In the following function definition,
FUNCTION AbsoluteValue (intNumber)
If intNumber < 0 then
intNumber = - intNumberEND IFAbsoluteValue = intNumberEND FUNCTION
our function is named AbsoluteValue and takes one argument. On line 2, we check if the value of the variable intNumber is less than 0, if it is, then we change the negative sign of the number (value) to a positve number. For example, if we pass -100 to this function, third line above will set intNumber to -(-100), which is 100. The line 5 (AbsoluteValue = intNumber) shows how to return a value from a function. To return a value from a function, simply set the name of the function to the value you want to return. The value that is returned by a function can be printed or assigned to another variable for later use in the program.
In the following, we use the above function:
FUNCTION AbsoluteValue (intNumber)
If intNumber < 0 then
intNumber = - intNumberEND IFAbsoluteValue = intNumberEND FUNCTION
DIM i, intFuntionReturnsi = -9DO WHILE (i <= 6)
intFuntionReturns = AbsoluteValue (-i)
response.write "Value passed: " & i & ". "
response.write "Value returned: " & intFuntionReturns & "<br>"
i = i + 3LOOP
To this function, we use a DO WHILE loop to pass different values between -9 and 6. In the loop, we first -9 to our function. The function returns back 9. The second time the loop executes, we pass -6 and the function returns 6. The following shows the output of the above code:
Value passed: -9. Value returned: 9
Value passed: -6. Value returned: 6
Value passed: -3. Value returned: 3
Value passed: 0. Value returned: 0
Value passed: 3. Value returned: 3
Value passed: 6. Value returned: 6
Built-in math functions
Just like other programming languages, VBScript provides a rich library of built-in functions to deal with including strings, dates, typecasting, basic math, etc. When you consider creating functions in any programming language, it is useful to familiarize yourself with the available built-in functions of that language. The idea is if the programming language already provides a built-in function for a specific task, as a programmer, you do not have to create your own function for that task. The built-in function is likely to be more efficient so avoid reinventing-the-wheel!
In this section, we will cover some of the built-in mathematical functions available in VBScript. Most of those functions are very simple to use. Table 1 provides a reference to mathematical functions available in VBScript.
| Table 1 Built-in math functions | |
|---|---|
| Built-in math function | Meaning |
| Abs (number) | Absolute value |
| Exp (number) | e ^ number; e = 2.71828182845905 |
| Fix (number) | Returns integer portion |
| Int (number) | Returns integer portion |
| Hex (number) | Coverts base 10 to hexadecimal |
| Oct (number) | Coverts base 10 to octal |
| Round (number) | Rounds to an integer |
| Round (number, dec) | Rounds to dec decimal places. |
| Sgn (number) | Sign |
| Sqr(number) (number > 0) | Square root |
Here is a quick review of some of the built-in math function available in VBScript:
Abs (number) returns the absolute value of a number. In other words, if the number is greater than or equal to zero, the number is returned. If, however, the number is less than zero, the negation of the number is returned. For instance, Abs (5) would return 5 and Abs (-1) would return 1.
Exp (number) raises e (approximately 2.71828) to the power number. For example, Exp (5) says e^5, which is approximately 148.41315.
Fix (number) returns integer portion, greater than or equal to the number. For instance, Fix (-5.80) returns -5.
Int (number) is different from Fix(number) because Int (number) returns integer portion less than or equal to number. For example, Int (-5.80) returns -6.
Hex (number) returns strings consisting of the number converted to hexadecimal base. For example, Hex (10) returns A, Hex (11) returns B, Hex (12) returns C, etc.
Oct (number) returns strings consisting of the number converted to octal base. For instance Oct (8) returns 10, Oct (9) returns 11, Oct (10) returns 12, etc.
Round (number) rounds a number to the nearest integer; for example, Round (5.45) rounds 5.45 to 6 and Round (5.01) returns 5.
Round (number, dec) rounds a number to dec decimal places. Round (5.45, 1) rounds 5.45 to 1 decimal place: 5.4. Round (100.67899, 3) returns 100.679.
Sgn (number) returns -1 if number is less than 0, 0 if number is 0, and 1 if number is greater than 0. Consider the following as examples: Sgn(-5.9) returns -1, Sgn(0) returns 0; and Sgn(5) returns 1.
Sqr (number) (number > 0) provides a square root of number, provided the number is positive. For example, sqr (4) returns 2, sqr (100) returns 10.
Built-in date functions
VBScript provides number of built-in date functions to find time, and manipulate dates and time. For example, to get current date, you can use the date () function. (Please note the examples on this page use the date/time on the server, which may not be the same as your local date or time!)
<%
response.write "Today is " & date ()%>
That returns
Today is 4/17/2021
To find the current time, you can use the Time () function, as:
<%response.write "Current time is " & Time ()%>
That will return:
Current time is 1:47:23 AM
If you need to get both the date and time, you can use the now () function. The now () function returns current date and time, for example
<%response.write "Now is " & Now ()%>
returns
Now is 4/17/2021 1:47:23 AM
Manipulating dates and time
So now you know how to get the current date and time; let’s next cover how to manipulate dates and time data. With the DateAdd () function, we can add time interval values to a specific time or date. The general syntax for using DateAdd () is DateAdd (interval, number, date); where interval is a string that represents time interval values (see table 1), number is the number of intevals (like year, quarter, month, etc.) you want to add, and date is a date value.
| Table 1 Interval values for DateAdd () | |
|---|---|
| Interval Value | Represents |
| “yyyy” | Year |
| “q” | Quarter |
| “m” | Month |
| “d” | Day |
| “ww” | Week (week of year; from 1 to 52) |
| “h” | Hour |
| “n” | Minute |
| “s” | Second |
Table 2 shows examples of DateAdd () function in use.
| Table 2 DateAdd () function in use | ||
|---|---|---|
| Code | Output | Explanation |
| response.write dateadd(“yyyy”, 1, date) | 4/17/2022 | Adds 1 year to current year. |
| response.write dateadd(“q”, 2, date) | 10/17/2021 | Adds 2 more quarters to current quarter. |
| response.write dateadd(“m”, 5, date) | 9/17/2021 | Adds 5 more months to current month. |
| response.write dateadd(“ww”, 10, date) | 6/26/2021 | Adds 10 more weeks to the current week of year. |
| response.write dateadd(“h”, 5, time) | 6:47:23 AM | Displays time 5 hours from now. |
| response.write dateadd(“n”, 53, time) | 2:40:23 AM | Displays time 53 minutes from now. |
| response.write dateadd(“s”, 10, time) | 1:47:33 AM | Adds 10 seconds to current time. |
So you may agree adding date/time values is easy with the DateAdd () function. But what if you wanted to subtract date/time values, is there a VBSCript date function to do that? Yes, the DateDiff () function finds the time between two dates. The general syntax for using DateDiff () function is DateDiff (interval, date1, date2); where interval is one of the interval values shown in table 3, and date1 and date2 represents some date or time values.
| Table 3 Interval values for DateDiff () | |
|---|---|
| Interval Value | Represents |
| “yyyy” | Year |
| “q” | Quarter |
| “m” | Month |
| “d” | Day |
| “ww” | Week (week of year; from 1 to 52) |
| “h” | Hour |
| “n” | Minute |
| “s” | Second |
Table 4 shows examples of DateDiff () in use. Notice that the date values in the table are surround by the pound signs (#s) to avoid division. Also, note the use of timeserial () function, called with a specific hour, minute and second values.
| Table 4 DateDiff () function in use | ||
|---|---|---|
| Code | Output | Explanation |
| response.write DateDiff(“yyyy”, #1/1/2000#, date) | 21 | Number of years since 2000. |
| response.write DateDiff(“q”, date, #1/1/2080#) | 235 | Number of quarters to the first quarter of 2080. |
| response.write DateDiff(“m”, #1/1/1800#, date) | 2655 | Number of months since 1800. |
| response.write DateDiff(“ww”, #12/1/2000#, #12/10/2000#) | 2 | Number of calendar weeks between 12/1/2000 and 12/10/2000. |
| response.write DateDiff(“h”, timeserial (0,0,0), timeserial (5,50,0)) | 5 | Difference, in hours, between 12:00:00 AM and 5:50:00 AM. |
| response.write DateDiff(“n”, timeserial (0,0,0), timeserial (0,50,0)) | 50 | Difference, in minutes, between 12:00:00 AM and 12:50:00 AM. |
| response.write DateDiff(“s”, timeserial (0,0,0), timeserial (0,50,0)) | 150 | Difference, in seconds, between 12:00:00 AM and 12:02:30 AM. |
The timer () built-in function returns number of seconds since midnight. This function can be useful to determine the amount of time it takes to execute some code. For example, the following shows how many seconds the loop will take to complete:
dim intStartTime, intEndTime, intSecondsPassed, intEventNumberSumintStartTime = timer ()response.Write "Seconds since midnight, before the loop starts: " & intStartTimeintEventNumberSum = 0for i = 0 to 10000
select case isEven(i)
case -1
case 0
intEventNumberSum = intEventNumberSum + i
end selectnextresponse.write "<br>Sum of even numbers 0 - 10000 is " & intEventNumberSumintEndTime = timer ()response.Write "<br>Seconds since midnight after the loop is complete: " & _ intEndTimeintSecondsPassed = intEndTime - intStartTimeresponse.write "<br>Time taken to complete the for loop: " & intSecondsPassedfunction isEven (num)
dim result
result = num mod 2
select case result
case 1
isEven = -1
case 0
isEven = result
end selectend function
In this example, we use a for loop to find the sum of even numbers between 0 and 10000. Computing this calculation will take some time and we’ll use the timer () function to determine how long exactly this loop takes to perform the calculations.
So before we execute the loop, we call the timer () function (see line 2) to get time in seconds since 12:00 AM. The next line prints this time. The variable intEventNumberSum stores the sum of even numbers (see line 9: intEventNumberSum = intEventNumberSum + i). In the for loop, we call the isEven (i) function and pass the current value of i. This function returns 0 if the value of i is a even number; otherwise -1.
After the loop is done, we call the timer () function again; see line 13: intEndTime = timer (). Note with this function call more time has passed since we last called this function, line 2. In other words, the value of intStartTime is likely to be less than (or perhaps equal to intEndTime if our loop completes immediately) intEndTime. To determine the difference between these two variables, we subtract intStartTime from intEndTime (see line 15: intSecondsPassed = intEndTime – intStartTime).
The following shows the output of the above code:
Seconds since midnight, before the loop starts: 6443.46
Sum of even numbers 0 - 10000 is 25005000
Seconds since midnight after the loop is complete: 6443.476
Time taken to complete the for loop: 1.611328E-02
Retrieving date/time values
When programming, often you just want to retrieve just the current month, year, day or some other specific time, but not the rest of date information returned by date functions available in VBScript. With DatePart (), you can retrieve only a specific part of a date/time value. For instance, you can retrieve the current year, quarter, month, day, week of the year (from 1 to 52), hour (from 0 to 23), minute, or second. The general syntax for calling DatePart () is
DatePart(IntervalValue, dateValue)
The first argument above represents the specific value you want to retrieve (see table 5 for possible interval values for the first argument) from a specific date or time (argument 2).
| Table 5 Interval values for DatePart () | |
|---|---|
| Interval Value | Represents |
| “yyyy” | Year |
| “q” | Quarter |
| “m” | Month |
| “d” | Day |
| “ww” | Week (week of year; from 1 to 52) |
| “h” | Hour |
| “n” | Minute |
| “s” | Second |
See table 6 for some examples.
| Table 6 DatePart () function in use | ||
|---|---|---|
| Code | Output | Explanation |
| response.write DatePart(“yyyy”, date) | 2021 | Returns current year. |
| response.write DatePart(“q”, date) | 2 | Returns current quarter. |
| response.write DatePart(“m”, date) | 4 | Returns current month. |
| response.write DatePart(“ww”, date) | 16 | Returns week of the year (from 1 to 52). |
| response.write DatePart(“h”, time) | 1 | Returns current hour. |
| response.write DatePart(“n”, time) | 47 | Returns current minute from the time () function. |
| response.write DatePart(“s”, time) | 23 | Returns current second from the time () function. |
VBScript also provides number of other functions that provide specific date or time values. See table 7 for a summary of these functions.
| Table 7 functions for retrieving time and date values | |
|---|---|
| Function | Description |
| Year (date) | Returns the year portion from date. |
| Month (date) | Returns the month portion from date. |
| MonthName (MonthInt) | Returns a string with the name of the function. This function also allows you to pass the second argument although it is optional. The second argument indicates whether you want the string name of the function as a abbreviation or the whole month. The default is false, which means the whole name of the month is returned; if true is specified as the second argument, a abbreviated name of the month is returned. |
| Day (date) | Returns the day portion from date. |
| Hour (time) | Returns the hour portion from time. |
| Minute (time) | Returns the minute portion from time. |
| Second (time) | Returns the second portion from time. |
See table 8 for examples of the functions mentioned in table 7.
| Table 8 examples of using functions described in table 7 | ||
|---|---|---|
| Code | Output | Explanation |
| <%= Year (date) %> | 2021 | Returns current year. |
| <%= Month (date) %> | 4 | Returns current month. |
| <%= MonthName (12) %> | December | Returns the full name of the month. |
| <%= MonthName (12, false) %> | December | Also returns the full name of the month. |
| <%= MonthName (12, true) %> | Dec | Returns abbreviated name of the month. |
| <%= Day (date) %> | 17 | Returns day portion from the date. |
| <%= Hour (time) %> | 1 | Returns the hour portion from time. |
| <%= Minute (time) %> | 47 | Returns the minute portion from time. |
| <%= Second (time) %> | 23 | Returns the second portion from time. |
String functions
VBScript provides a rich library of built-in functions to deal with strings. With string functions, you can manipulate strings; for example, you can retrieve or change part of a string. Although all the functions we’ll discuss may seem overwhelming at first, they are quite easy to use and remember once you try them a couple of times.
The LCase (string) returns string with all all its uppercase letters converted to lowercase letters. For instance, LCase (“String Functions In Asp Are Easy To Use.”) will return: string functions in asp are easy to use. If the string contains special characters or numbers, those characters are unaffected by the LCase function. Also, string function names are not case sensitive in VBScript so you can use either all lowercase or uppercase letters or even a combination thereof when invoking a function. The following are some of legitimate ways of calling the LCase (string) function: Lcase (string), lcase (string), etc.
Similarly, UCase (string) function returns a string with all its lowercase letters converted to uppercase letters. As with the LCase () function, non-alphabetical characters are not changed by the Ucase () function. For instance, UCase (“2nd string function”) will return 2ND STRING FUNCTION.
LTrim (string) removes all space characters from the left side of string. For instance, LTrim (” LTrim (string) function removes all spaces from the left side of a string “) will return LTrim (string) function removes all spaces from the left side of a string . Notice that LTrim (string) preserves spaces on the right side of the string.
Similar to LTrim () is the RTrim (string) function. What do you think RTrim () does? Well, RTrim () removes all space characters from the right side of a string. For example, RTrim (” RTrim (string) function removes all spaces from the right side of a string “) returns RTrim (string) function removes all spaces from the right side of a string. Notice that RTrim (string) preserves spaces on the left side of the string. So what do you do if you want to removes spaces from the both side of a string? Well, you could first remove the spaces on the left of a string by calling the LTrim () function and then call the RTrim () function with the result returned from the LTrim () function. There is, however, much more efficient way to remove spaces on both sides of a string.
With Trim (string) function, you can remove space characters from both side of a string. For instance, Trim (” some text “) returns just some text. The LTrim (), RTrim (), and Trim () function come in handy when you are requesting input from the user. The user, for instance, may inadvertently or intentionally enter some extra space characters when entering data. To catch any possible space characters surrounding the input, the Trim () function can be used to remove spaces on the left and right sides of the input string.
If you wanted to find out the number of characters in a string, you can use the len(string) function. Len(“string functions”) will return 16. Note the function also counts space characters present in the string.
The Space (number) returns a string consisting of number of spaces. So space(3) returns ” “. This can be useful for formatting, especially when writing to text files.
Collecting and processing form information
In this section, you will learn how to use the Request object for collecting form data from the browser. Forms are popular way of collecting information from the user.
What are forms?
A form is a web document used for collecting information from the user. For us to collect any information from the user, basically we need to:
- create and display the form
- have the user submit the form to the server (i.e., by clicking on the “Submit” button)
- process the submitted form data
When we work with forms or any other means to collect information from the user, we cannot assume that the user will enter correct data. If the user enters invalid data, we need to somehow programmatically catch that. The form validation is normally done with client-side scripts (such as JavaScript, VBScript). For this section, we will assume that the user will enter valid data so we won’t be doing any data validation.
A form is created with HTML <form> tag. We will assume here that you know how to create a form and decide which form elements (such as text boxes, check boxes, radio buttons, selection list, etc.) to use to collect the information you desire from the user. It is very important to choose the appropriate form field type when creating a form. For instance, choose text boxes to obtain numerical (phone number, street number, etc.) or string (person’s name or title, company name, etc.) input. Display choices for known and common inputs (i.e., listing names of countries or states versus asking the user to enter them into a text field) to avoid typos and incorrect data.
The difference between GET and POST
There are two methods used for submitting information to the server:
- GET
- POST
The GET method is also referred to as querystring. In this method, information to the server is sent as variableName = Value and the is added to the URL of the form. The querystring starts with a question mark (?) and each variable is separated by an ampersand (&). The variable here is the name that is used in the form element. For example, if your text box is named “first_name” and when the user submits the form with that field with the value “John”, this is what is submitted to the server: URL/?first_name=John.
In the POST method, the data that the user enters and submits is not added to the end of URL.
The main advantage of the GET method is that the user could bookmark the results of a processed form to eliminate the need for reentry of the same data. The main advantage of the POST method, however, is that it does not display personal data (user name or passwords, etc.) in the URLs. Thus this keeps URLs short. Generally speaking, if you are collecting a large amount of data or personal data from the user you should consider using the POST method.
If you are using the GET method for your form, use the request.QueryString() method to collect the form data. For the POST method, use the request.Form() method. Click on the appropriate link below to learn more about retrieving values for a particular form element:
| HTML form method: | GET | POST |
|---|---|---|
| ASP object to use | Request.QueryString () | Request.Form () |
| Type of form field to process | Text box | Text box |
| Password box |
