Creating image maps
If you want to add some interactivity to your images, you may consider using image maps. With image maps, you can define multiple clickable regions on a single graphic. To define clickable regions on a single image, set up hotspots within a single image. A hotspot is a defined area on an image that acts as a hypertext link. The hotspots are defined through the use of image maps. Image maps list the coordinates that define the boundaries of the hotspots (or the regions that act as hypertext links) on an image.
The whole idea behind using image maps is to link one image to multiple destinations. In how to insert graphics page, we discuss how to link one image to just one destination. On this page, you will learn how to create image maps or multiple hyperlinks on a single image. There are two types of image maps:
- server-side image maps
- client-side image maps
Server-side image maps
In a server-side image map, the server controls the image map. A server is a computer that store web pages and serves those pages when a client requests a page. When we use a server-side image map, we define the coordinates of the hotspots in a server-side script. Whenever a user clicks on a hotspot on an inline image, the appropriate coordinates are sent back to the server to activate the appropriate hyperlink. One of the main drawbacks of using server-side image map is that server-side image maps can be slow to operate. This is so because every time a user clicks on an inline image map, that information has to be sent to the server and then the server has to process that request.
Client-side image maps
In a client-side image map, the image map is defined in an HTML file and that is processed by the browser locally. Because client-side image maps are processed locally, they tend to be more responsive than server-side image maps. Thus client-side image maps can be tested using a local computer; whereas, to test the server-side image maps, you’ll need a server. To show you how to create image maps, we will use client-side image maps so you can easily test without using a sever!
There are two easy steps to create an image map:
- define image map hotspots
- use the image map
Defining image map hotspots
To create image an image map, you need coordinates of the points corresponding to the hotspot boundaries. In other words, you will define an area, by using coordinates, for each hyperlink that you want on an inline image. To find coordinates for a specific area for an image, you will need a special program that shows you coordinates. As an example, Macromedia’s Dreamweaver 2004 allows you to create image maps by letting you draw the areas on an image. For each area you draw, the program will write the appropriate coordinates in your web page code file.
For our example, we will show you the coordinates for each area that we want to define on an inline image. The general syntax for an image map tag is:
<map name="mapName">
<area shape="areaShape" coords="coordinates" href="URL">
</map>
So an image map is defined with the <map> tag. The name attribute inside the <map> tag gives a name to the image map. To be able to use an image map, we must assign a name to an image map. Within the <map> tag, we use the <area> tag to specify the areas of the image that will act as hotspots. We can include as many <area> tags within the <map> tag we choose. Each of the <area> tag will act as a seperate hyperlink.
The <area> tag has three attributes:
- shape – refers to the type of shape you want for the hotspot. You have three choices for the shape: rect, circle, and poly.
- coords – refers to the coordinates for the location of a hotspot. The value for this attibute depend on the type of shape you want. The coordinates are expressed as a point’s distance in pixels from the left and the top edges of an inline image. The coordinates (0,0) refers to a point where the image starts to get displayed. For instance, the coordinates (31,9) refer to a point that is 31 pixels from the left edge and 9 pixels down from the top on an inline image.
- href – refers to the URL of the hypertext link that the hotspot points to.
Access these sub topics to learn how to create
Creating a rectangular hotspot
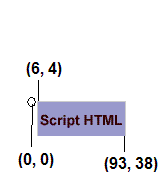
To define a rectangular hotspot, you have to define two points: the upper-left corner and the lower-right corner. For the following image,

the upper-left corner coordinates are (6, 4) and the lower-right corner coordinates are (93, 38). The coordinates (6, 4) refer to a point on the image that is 6 pixels to the right and 4 pixels down from the top of the image. The coordinates (93, 38) refer to a point on the image that is 93 pixels to the right and 38 pixels down from the top of the image. Figure 1 shows where the image starts (coordinates (0, 0)), the upper-left corner of the hotspot (coordinates (6, 4)), the lower-right corner of the hotspot (coordinates (93, 38)).

the upper-left corner at coordinates (6, 4), and the
lower-right corner at coordinates (93, 38).
The following shows the HTML code to create the rectangular hotspot:
<map name="ScriptHTML">
<area shape="rect" coords="6,4,93,38" href="HTML-introduction.asp">
</map>
Finally, to add the image map to our web page, we need to use the ScriptHTML image map we defined above. To use an image map, simply add the usemap attribute to the image map graphic. For instance,
<img src="http://www.scriptbuzz/images/html/script-html.GIF" usemap="#ScriptHTML" alt="Learn to script HTML">Remember to use the pound sign (#) before the image map name. The following shows the output:

Creating a circular hotspot
The coordinates required for creating a circular hotspot differ from those of a rectangular hotspot. A circular hotspot is defined by the locations of its center and its radius. For the following image,

the center point is at coordinates (35, 35) and the radius is 32. See figure 2.

circular hotspot: center point (35, 35) and radius 32.
The following shows the HTML code to create the circular hotspot:
<map name="ScriptASP">
<area shape="circle" coords="35,35,32" href="HTML-Active-Server-Pages.asp">
</map>
Finally, to add the image map to our web page, we need to use the ScriptASP image map we just defined above. To use the ScriptASP image map, simply add the usemap attribute to the image map graphic. For instance,
<img src="http://www.scriptbuzz/images/html/circular-hotspot.GIF" usemap="#ScriptASP" alt="Learn to script ASP">Remember to use the pound sign (#) before the image map name. The following shows the output:

Creating a polygonal hotspot
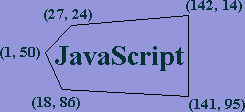
What do you if your image is not rectangular or circular shaped and you wanted to create a hotspot? For irregular shaped images, you can use the polygon hotspot. To create a polygon hotspot, use the poly value for the shape attribute. Just like we did with the rectangular and circular hotspots, we supply the coordinate values for the desired place of hotspot on an image. We will use the following image

with the following coordinate values: (18, 86), (141, 95), (142, 14), (27, 24), and (1, 50). The following image shows where each of these points are located on the image:

Next, we use the coordinate information shown above to create our <map> tag with the <area> tag:
<map name="polygonalHotspot"><area shape="poly" coords="18,86,141,95,142,14,27,24,1,50" href="http://www.scriptbuzz.com/javascript/scripting-javascript.asp"></map>
Finally, add the hotspot name to the <img> tag to create the polygonal hotspot:
<img src="http://www.scriptbuzz.com/images/html/polygon.gif" alt="Polygon shape" width="150" height="100" border="0" usemap="#polygonalHotspot">
Remember to use the pound sign before the image map name. The following shows the output of the above code:

