HTML basics
Before you start writing HTML code, you should familiarize yourself with some basic concepts of HTML. Pick a topic from the list below to get started:
HTML is the foundation of every website—it’s like the skeleton that gives a webpage its structure. Imagine it as the framework of a house, where headings, paragraphs, and images are the walls, doors, and windows. You don’t see HTML directly on a webpage, but it works behind the scenes to organize text, links, and pictures. Learning HTML is the first step to creating your own websites, and it’s easier than you might think! With just a few simple tags, you can start building web pages from scratch.
What is HTML
To convey information about a document’s structure or presentation, markup information is added to the document. Markup languages are widely used in everyday computing. For instance, word processors use codes that indicate the structure and presentation of a document. The word processors write, behind the scenes, the necessary markup to produce a document that you see on the screen. HTML, however, is not a behind-the-scenes markup language.
HTML stands for Hypertext Markup Language. This markup language is used to create web documents. A web document is viewed in a web browser, like the one you are using to read this document.
Just like in a word processor you can specify the appearance of text, you can write HTML code to specify how the text or content of a web page should look. For instance, in a word processor, you could choose to use Times Roman for font type and make some text bold or italic. Similarly, in HTML code you could specify what type of font to use or whether it should be bold or not. In the former, you could make the selection using a mouse; however, for the letter, you would have to write instructions or HTML code.
As you learn HTML, you will discover that different browsers may display the same web page differently. Why? Simply put, there is a portability issue with the kinds of computers like Windows, UNIX, and Macintosh. Thus depending on the type of computer and/or browser you are using will determine how the web page is displayed. To overcome this portability issue, a web page author could use style sheets to make page compatible with more computers.
Versions of HTML
The set of rules under which HTML operates is known as syntax. The syntax or the rules for creating webpages is developed by World Wide Consortium (or W3C). Access the versions of HTML page for more information.
HTML editors
There are so many software packages available to develop HTML. The software packages can be grouped into two main categories:
- text-based (or code-based) editors
- WYSIWYG (what you see is what you get) editors
1. Start the Run Command

2. Type “notepad” in the textbox.
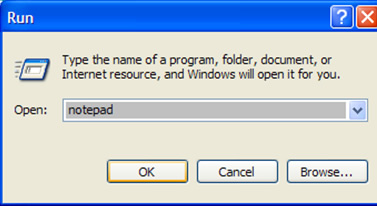
Next, click on the OK button to start Notepad
Macromedia Homesite is a popular text-based HTML editor. The editor provides many HTML-specific options that are not available in the Windows Notepad.
WYSIWYG editors
Because WYSIWYG (pronounced wuzzywig or wizzywig) HTML editors do not require much HTML knowledge, they tend to be expensive. These editors allows you to directly work in the “design” or “preview” view instead of the code view. The main advantage of working with the design view is that you can design the layout of your page by dragging-and-dropping pieces of your page layout. Thus a web page can be developed more quickly than by hard-coding it by hand using a text-based editor.
There are several popular WYSIWYG editors available:
Remember these editors can help you create web pages but they cannot teach you HTML. If you first master HTML, you will utilize these software packages more efficiently.
Text-based editors versus WYSIWYG editors
So what type of software package should you choose to develop your web pages? The following points may help you decide:
| Text-based (or code-based) editors | WYSIWYG editors |
|---|---|
| Better control. Because text-based editors require knowledge of HTML, the developer has more control over what is written to produce a web page. In some cases, a software package (like FrontPage) may write proprietary code that may not be interpreted by all the brwosers.Faster editing. You can quickly change your code unlike WYSIWYG editors. WYSIWYG editors require, for example, a lot of computer-resources to start-up or load/open a page.More flexibility. You can edit your code directly at the desired location. This cannot be always done with WYSIWYG editors. | Support for other scripting languages. WYSIWYG editors provide advanced features to code in other programming/scripting languages such as JavaScript, XHTML, ASP/ASP.NET, PHP, and JSP.Faster/simplified development. WYSIWYG editors allows you to develop pages quickly as the software writes the necessary code in response to the layout you design for your web page.Better organization. Dreamweaver, for instance, allows you to define a site folder that contains all the files that make up the website. By defining a local site folder, you have many advantages including moving of files (without breaking links), searching of a particular term or tag in the entire site (without having the file open!), and FTP support to move only changed or new files to the server. |
If you still are not sure about which editor to use, download a trial version of each software that you want to try. After trying, decide which software is better suited for your needs.
Creating an HTML document
Before you start writing code to write a web page, it is a good practice to plan ahead the appearance of the web page. An HTML document has two elements:
- Document Content
- Tags
Document content is the information on a web page that the user will see. That information could be text or graphics, for example. As you start creating your own web pages, try finding out first what information you want to display and how you want to present it.
Tags are the HTML codes that control how the document content will appear. The tags, in other words, will determine whether the text will be bold, black or blue, or of font type Time New Roman or Airal.
Naming conventions
HTML files names are very important as they are used to locate or open the files. Remember these points when naming HTML files:
- Save your web page files with the .htm or .html file extension. (Both of these files represent HTML files, older systems such Windows 3.1 and DOS cannot recognize four-letter file extensions. Because the first three letters of .html and .htm are the same, those systems ignore the “l” and just recognize “.htm”.)
- Some web servers are case-sensitive. That means those web servers would consider page1.htm and Page1.htm as two different files. To avoid case sensitivity problems, use only lowercase or uppercase letters to name your files.
- Filenames should consists only of letters and numbers. Avoid using spaces, punctuation, or special characters. If you need to separate words, use hyphen (-) and underscores (_), for example, creating-an-HTML-document.htm or creating_an_HTML_document.htm.
These same recommendations should also be applied to naming folders of your web site. See the example below:
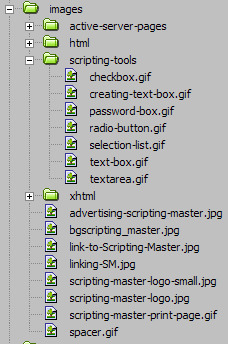
The image shows folder names follow the same naming conventions as the file names; for instance, folder names and file names are separated by a hyphen if the name consists of more than one word.
Basic structure of an HTML document
An HTML document has two* main parts:
- head. The head element contains title and meta data of a web document.
- body. The body element contains the information that you want to display on a web page.
* To make your web pages compatible with HTML 4, you need to add a document type declaration (DTD) before the HTML element. Many web authoring software add DTD and basic tags automatically when you create a new web page.
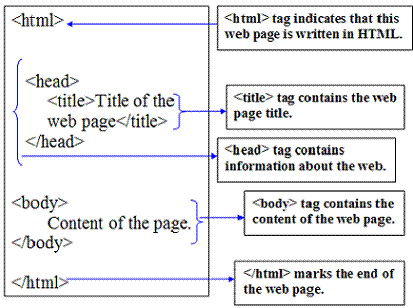
In a web page, the first tag (specifically, <html>) indicates the markup language that is being used for the document. The <head> tag contains information about the web page. Lastly, the content appears in the <body> tag. The following illustration provides a summary.
Understanding elements
To markup your web pages, you will need to learn the syntax (rules of a computing language) of HTML. HTML syntax is very simple to follow. Remember the syntax only controls the presentation or structure of a web page. The most fundamental piece of building block of HTML is the elements.
In HTML, an element refers to two different things:
- element of structure of a document (for example, paragraph, web page title, etc.).
- element in the sense of a tag (for example, <p>, <title>)
Because of the different meanings of the word “element”, it can be confusing what the word “element” means in a particular context. The following discussion may help you to understand the differences in the meaning. When we talk about the element in the sense of element of structure of a document, we are referring to the structure of the document; for example, document’s header information (head), title, body, etc. When, however, we use the word element to refer to a tag, we are talking about a specific HTML instruction that uses angled brackets like: <>. As the following table shows,
| Examples of elements of structure of a document | head | body | p |
|---|---|---|---|
| Examples of elements as tags | <head> | <body> | <p> |
an element becomes a tag when we use the angled brackets around it. To create a web page, we use tags. A tag instructs the browser what specific instruction to execute. Assume in your web page you want to emphasize some text as bold. To do this, HTML requires three pieces of information from you:
- With what tag do you want to emphasize the text? (Answer to this question determines what and where a specific HTML instruction will begin. In other words, this starts an HTML instruction.)
- What text do you want to make bold?
- Where do you want to stop the instruction? (An instruction should be ended with the same tag that started the instruction. See below.)
As an example, assume you want markup “World Wide Web Consortium” bold:
The World Wide Web Consortium (W3C) is a rule-making body for the Web.
So how would be write the necessary markup? Begin by answering to the three questions listed above. Here are the answers to each corresponding question:
- we will use the <b> tag. Think of this as turning ON the bold feature in HTML.
- we want to display “World Wide Web Consortium” as bold. Remember this text must be immediately following after the <b> tag.
- stop the instruction with </b> tag. This will turn OFF the bold feature of HTML.
So our HTML markup will become:
The <b>World Wide Web Consortium</b> (W3C) is a rule-making body for the Web.
Most elements in HTML have three parts: start tag, content, and end tag. The start tag is simply the element name surrounded by the angled brackets such as <b>, <body>, and <p>. The end tag is a element name surrounded by </ and > such as </b>, </body>, and </p>. In other words, an end tag simply has the forward slash (/) before the element name. So if you open (start) a tag with <i>, you will close (end) it with </i>.
Note: Not all HTML tags require a closing tag. For example, <img> tag, <br> tag, <hr> tag, etc. Also, none of these tags take any content. The <img> tag is used to display graphic files; the <br> tag is used to end a line, and the <hr> tag inserts a horizontal rule.
As stated earlier, a start tag instructs the browser to start a particular instruction. Conversely, an end tag marks the end of that instruction. Because typically a complete web page contains many tags and sometimes nested tags (tags within other tags), it is necessary to close all opened tags even if your web page displays correctly in a particular browser. Properly closing tags not only will help you to familiarize more with HTML tags, but it also will avoid any possibility of browsers displaying your web page incorrectly.
Main points to remember:
- Every element has a name such as head, title, p, i, and b.
- A tag is the element name surrounded by the angled brackets. This refers to a start tag such as <p>, <title>, and <i>. A start tag starts a particular HTML instruction.
- An end tag is the same as a start tag except the end tag has a forward slash between the < and the element name. An end tag stops a particular HTML instruction.
- Most elements have content, which is placed between the start and the end tags. Example, this is <b>bold</b>.
- Some elements have no content. Such elements/tags are known as empty tags.
- Some elements have no end tags. These are referred to as one-sided tags. A tag that has an opening and closing tag is referred to as two-sided tag.
Understanding attributes
In HTML, elements (or tags) have attributes or properties. As an HTML writer, attributes allow you to add extra instruction to your tags. Because each tag has its own unique attributes, you have to learn which attribute(s) belongs which tag. (See the attributes reference table for details.) Any attribute cannot be just applied to any tag. Think of attributes as options. As such, options can only be applied to tags if the tags offer those options. If you incorrectly apply an option to a tag, the browser is likely to ignore that option.
An attribute has two parts: attribute name and attribute value. Because of these two-parts, they are also referred to as pairs. The attribute name identifies (or defines) what special instruction you want to add to a particular tag. The attribute value, on the other hand, indicates (usually predefined) option for that attribute. So if you are going to use an attribute, you will need to have value for that attribute. Let’s go over the actual HTML.
align=”right” is an example of attribute-value pair. The word align is the attribute. The value of this attribute is right. A value of an attribute is enclosed in double quotation marks. Notice the value is on the right-hand side of the equal sign and the attribute name is on the left of equal sign. As you may have understood, align=”right” instructs the browser to align some text or object to the right hand side of the web page. You can apply this attribute, for example, to <p> tag to start your paragraph from the right hand side as:
This is my paragraph. Normally, text and other object on a web page are left-aligned. Because this paragraph has an extra instruction (align=”right”) to start this particular paragraph from the right, the paragraph is right-aligned.
The following shows the HTML code for the top paragraph:
<p align="right">This is my paragraph. Normally, text and other object on a web page are left-aligned. Because this paragraph has an extra instruction (align="right") to start this particular paragraph from the right, the paragraph is right-aligned.</p>We stated earlier that an attribute adds an extra instruction to a tag. When does this extra instruction stop executing (or finish applying value of the attribute)? This is an important question because many times you will have nested tags and it may not be clear to you when the instruction will stop. The answer is that the instruction stops once the browser encounters the corresponding ending tag for the tag that contains the attribute. In our example, any text outside of this paragraph tag will be unaffected (specifically will not be right-aligned) because we apply the attribute to just one <p> tag.
Keep the following points in mind while working with attributes:
- some attributes have predefined values. For example, for the align attribute, possible values include, left, center, justify and right. So if you use the align attribute, you should use one of these acceptable values.
- some attributes accept numerical values. For instance, for the width attribute, you can specify a numerical value such as 5 (which indicates 5 pixels), or 20% (which indicates 20% of the screen width).
Main points to remember for attributes:
- Attributes are specific to tag names. For example, for the <p> tag, you can use the align attribute but not the width attribute. The width attribute can only be used with tags such as <table>, <td>, and <img>.
- Attributes have values. Make sure to use the correct value for the correct attribute. For instance, you should not use color=”20″, or align=”brown”; instead use, color=”red”, and align=”justify”.
- Attribute values needs to be enclosed in double quotation marks. This is true especially if the value contains one or more spaces, for example, face=”Times New Roman”.
- Attribute values could come from a predefined list (such as color names red, green, blue, etc.) or from you (width of a table 50% or 800 pixels.)
Displaying an HTML document
After creating or as you create your web page, you should view your page at least one browser to detect any errors. If your webpage does not look the way you expect, then, you should make the necessary changes to correct any problem.
In this section, we will display a basic web page:
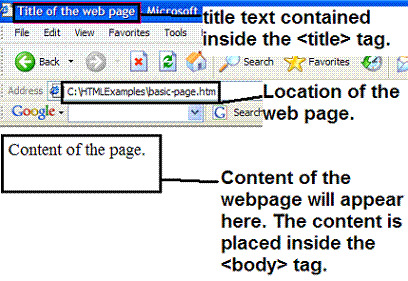
Figure 1 A simple web page with basic tags
As the web page shows, the content of the title tag is displayed on the top of the web page in the blue bar of Internet Explorer. If you wanted to have “My First Web Page” appear in the title bar, your title tag will look like :
<title>My First Web Page</title>Next, figure 1 shows the location of the web page. The address box shows the web page is located at “C:\HTMLExamples\basic-page.htm”. But why is it important to know where a web page is located? So you can view the web page in a browser. In this example, the webpage is saved to a local C drive in the HTML Examples folder. To access the web page, first you would open the c drive and then the HTML examples folder. Finally, you will click on the web page file you want to open.
Finally, the web page shows the content that is placed inside the body tag. Suppose you want to display the following text (with a white background) on a web page:
Before a webpage can be viewed in a browser, it must be saved.
To display that text your body tag will look something like this:
<body>Before a webpage can be viewed in a browser, it must be saved.</body>In summary, the title tag contains the title information of a web page. The body tag contains the content of the web page. Once a web page is saved, it can be viewed by double-clicking on the web page file. Alternatively, you can type the location of the web page in the address box.
Adding comments to HTML
As you create more pages, it may become difficult for you to understand your code in the future unless you use comments. By adding comments to your code, it could be a valuable reference guide for you when you look at your code in the future. Ideally, comments should be added to indicate what the code does. Comments are personal; so add anything that you think is impotent about your code. Remember, as you add comments to your pages, the file size of the web page will increase. That, in turn, may increase web page download time. So avoid use of excessive comments.
As you first start working with HTML, you may start by adding comments to every single line to remind you of what the code does. As you develop more experience and gather more knowledge about HTML, you will learn to comment only major parts of your web page. You may, for example, comment the width of nested tables you are using in your web page:

Examples of comments in HTML
In HTML, a comment begins with <!– and ends with –>. Any text you place after <!– is comment. Browsers ignore comment text. Again, comment is for your reference; it does not get displayed on the web page. In a comment, you can freely include special characters, such as ampersands, quotation marks, and angle brackets. Your comments can also span multiple lines. The browser will stop ignoring text once it reads –>.
Example of a single line comment:
<!--This is a small comment-->
Example of a multi-line comment:
<!--This comment is long. It is displayed on more than one line. Adding multi-line comments in HTML is easy as adding a single line comment. Whether the comment is single line or multi-line, it starts with <-- and ends with -->-->.
Important points about comments:
- Use comments as a reference guide. Avoid use of excessive comments.
- Add comments to major parts of your code; or for parts, that you are unsure of.
- Use of comments is a great way to communicate with other people working on the same web page.
- Start your comment with <– and end with –>
- Browsers and search engines ignore comments.
Making your HTML code readable
If you do not use space effectively in your HTML code, your code may look as:
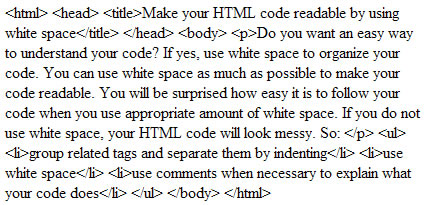
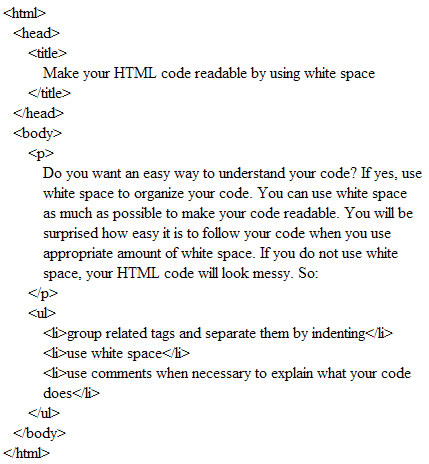
Reading and understanding this code is difficult because it is so disorganaized. Becuase extra white space is ignored by the browsers, you can use that to your advantage to orgnaize your code. Use of white space to seperate tags helps you better understand and maintain your pages. The following shows the updated code with the approriate amount of space:
Spacing and breaks
The amount of space you use for your HTML code can really affect how quickly and easily you understand your code. When your HTML document is long because it contains many tags, it becomes necessary to use space and breaks to identify where a tag begins and ends. Without the use of right amount of space in your code, it becomes difficult to manage HTML code because it is difficult to follow. You may, for example, close some tags when they are already closed and you may not be aware of this because the tags are hidden somewhere in your text.
Conversely, if you use space more than needed, then, you may have to scroll more to follow your code. Although there are no hard rules about how much space you can and cannot use, the following identifies areas of HTML code for proper amount of spacing:
- breaks between tags
- spacing between tags
- spacing inside the brackets
Breaks between tags
The first place where you can add breaks is to the following basic tags: <html>, <head>, <title> </title>, </head> <body>, </body> and </html>. The following shows an example of breaks between these basic and other tags:
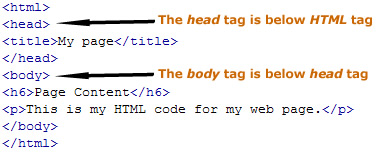
Breaks between tags
Note above each tag is on its own line. (This does not mean that each tag should be placed on its own line. If, for instance, your tag affects only a few words (i.e., link or bold text) within a paragraph, you may not need to break the line at each individual tags.) Simply use the RETURN or ENTER key to add breaks between tags.
Spacing between tags
In addition to adding breaks, you can also add space (or tabs) to enhance the understanding of your code. Because the <html> tag is the root tag of an HTML document, you may not need to use any extra spacing for this tag. All other tags, however, inside of this root tag should be indented:
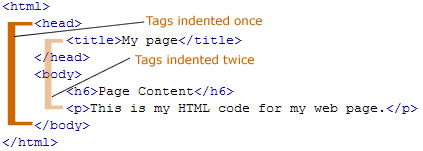
As indicated above, the <head>, and <body> tags and their corresponding closing tags are indented once. The inner tags (<title>, <h6>, and <p>) inside these main tags are indented twice.
Spacing inside the brackets
Lastly, you can add space inside the angle brackets of a tag to enhance the understanding of your code. You can add space inside the angle brackets when you use attributes:

As the image above shows, the first attribute is separated from the tag by one space. Similarly, subsequent attributes are separated by one space.
Avoiding unnecessary space in HTML code
As you try to help yourself to make your code more readable, you may start using space where it is not needed. Remember browsers ignore any extra space you may have in your code. That does not mean you should use extra space when it is not needed, however. There are two areas where the use of space should be avoided:
- space between the tag name and brackets
- space between the tag name and the text it affects
Space between the tag name and brackets
There should be no space between a tag name and its angle brackets. (This page explains when to use space inside the brackets when you are using attributes.) As an example, avoid:
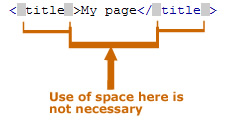
There is no reason to use space between a tag name and the angle brackets. So the title tag above should be rewritten as:
<title>My page</title>
Space between the tag name and the text it affects
Space should also be avoided when you use a tag that affects some text (or some other web object):

The code shown above should instead be rewritten as:
<p>This is a <a href="paragraph.asp">paragraph</a> text.</p>
