Streamlining CI/CD for Static Websites with AWS Amplify Console and GitHub Integration
Deploying and managing static websites, from simple portfolios to complex single-page applications (SPAs) built with frameworks like React, Vue, or Angular, can often involve a multi-step process: building the code, uploading to a storage service (like Amazon S3), configuring a Content Delivery Network (CDN) like Amazon CloudFront, and setting up a CI/CD pipeline for automated updates. This can be time-consuming and require significant DevOps expertise.
AWS Amplify Console dramatically simplifies this entire workflow, offering a fully managed hosting and CI/CD service specifically designed for modern web applications. Its seamless GitHub integration allows you to set up a robust CI/CD pipeline for static websites with just a few clicks, automatically building and deploying your code every time you push changes to your repository.
This article will walk you through the process of how to deploy a static website with AWS Amplify Console and GitHub, highlighting its benefits for streamlining CI/CD and ensuring your website is always up-to-date.
Why Choose AWS Amplify Console for Static Websites?
Before diving into the “how-to,” let’s understand why AWS Amplify Console is such a compelling choice for static site CI/CD:
1. Fully Managed Hosting:
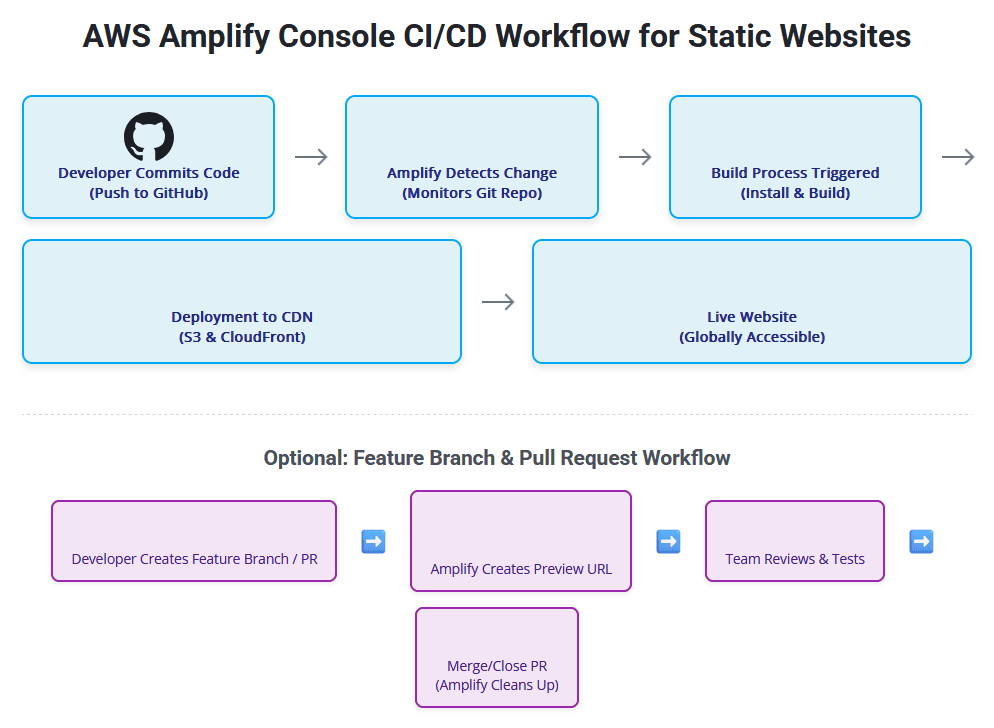
Amplify handles all the underlying infrastructure, including S3 for storage and CloudFront for global content delivery (CDN), without you needing to configure them manually. This means faster load times for your users worldwide.
2. Built-in CI/CD with Git Integration:
- Connect directly to your GitHub (or Bitbucket, GitLab, AWS CodeCommit) repository.
- Automatically triggers a build and deploy process on every code commit to a connected branch.
- Eliminates manual deployment steps and reduces human error.
3. Automatic Branch Deployments & Pull Request Previews:
- Automatically deploys new feature branches to unique preview URLs, enabling easy testing and collaboration.
- Pull request previews allow team members to review changes in a live environment before merging, significantly improving quality assurance.
- When a feature branch is merged or deleted, Amplify can automatically tear down the preview environment.
4. Custom Domains and SSL/TLS:
- Easily connect your custom domains (e.g.,
yourwebsite.com). - Amplify automatically provisions and renews free SSL/TLS certificates (via AWS Certificate Manager) for secure HTTPS access.
5. Atomic Deployments:
- Ensures that new deployments are live only when the entire build process is complete, preventing downtime and showing partial updates to users.
6. Customizable Build Settings:
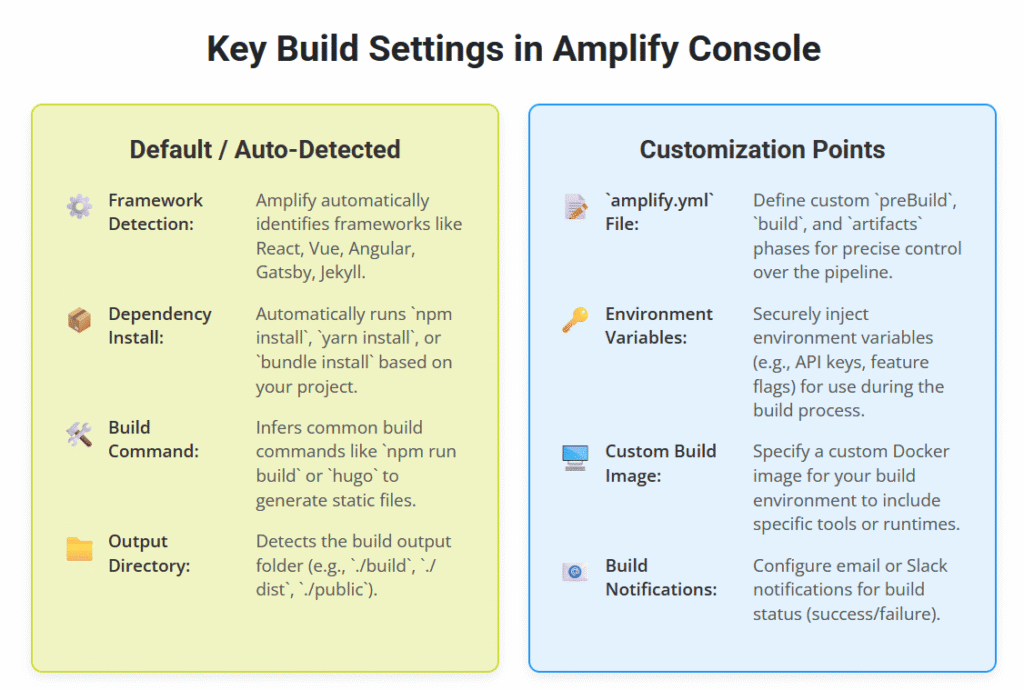
- Amplify automatically detects popular frameworks (React, Angular, Vue, Gatsby, Jekyll, etc.) and suggests build commands.
- You can customize the build process with an
amplify.ymlfile in your repository, allowing for specific dependencies, environment variables, and build steps.
7. Basic Authentication and Redirects/Rewrites:
- Add password protection to your entire site or specific branches for staging/development environments.
- Easily configure redirects and rewrites for friendly URLs or SEO purposes.
8. Cost-Effective:
- You only pay for what you use – primarily for build minutes and data transfer, which is highly economical for static sites.

Prerequisites
Before you start, ensure you have the following:
- An AWS Account: With appropriate permissions to create Amplify applications.
- A GitHub Account: And a GitHub repository containing your static website’s source code (e.g., a React app, plain HTML/CSS/JS, Jekyll site, etc.).
- Your Static Website Code: Ready to be pushed to your GitHub repository. Ensure it has a
buildscript (e.g., inpackage.jsonfor JS frameworks) that outputs static files to a designated directory (e.g.,build,dist,public).
Step-by-Step Guide: Deploying with AWS Amplify Console and GitHub
This guide assumes your static website code is already in a GitHub repository.
Step 1: Sign in to the AWS Amplify Console
- Open your web browser and go to the AWS Management Console.
- Search for “Amplify” in the services search bar and select “AWS Amplify”.
- You’ll land on the AWS Amplify Console homepage.
Step 2: Connect Your GitHub Repository
- On the Amplify Console welcome page, under “Host your web app,” click “Get started”.
- You’ll be presented with options to deploy your app. Choose “GitHub” as your Git provider and click “Continue.”
- Tip: If this is your first time connecting GitHub, Amplify will prompt you to authorize AWS Amplify to access your GitHub account. Follow the on-screen instructions, which typically involve signing in to GitHub and granting permissions to the AWS Amplify GitHub App. This app provides fine-grained control over which repositories Amplify can access.
- Once authorized, you’ll be redirected back to the Amplify Console.
- In the “Add repository branch” section:
- From the “Repository” dropdown, select the GitHub repository that contains your static website code.
- From the “Branch” dropdown, select the branch you want to deploy (e.g.,
main,master, orproduction). This will be your primary deployment branch for your live site.
- Click “Next”.
Step 3: Configure Build Settings
Amplify is smart! It usually auto-detects your frontend framework (React, Vue, Angular, etc.) and populates the build settings automatically.
1. On the “Build settings” page, review the automatically detected settings.
- App name: This will be your application’s name in Amplify.
- Build settings: This section shows the
amplify.ymlconfiguration (or an inferred one). It typically includes:version: The build spec version.frontend: Defines the build commands and the output directory.phases:preBuild: Commands to run before building (e.g.,npm install).build: The actual build command (e.g.,npm run buildorhugo).
artifacts:baseDirectory: The directory where your static files are generated (e.g.,build,dist,public).files: Which files to deploy (usually**/*for all files).
2. Customize (Optional but Recommended):
- If your project requires specific environment variables during the build process (e.g., API endpoints, feature flags), click “Add environment variables” under “Advanced settings.”
- If you need to fine-tune the build commands, you can edit the
amplify.ymldirectly in your repository (Amplify will pick it up automatically) or edit it via the Console.
3. Click “Next”.
Step 4: Review and Deploy
- On the “Review” page, carefully check all your configurations: repository, branch, app name, and build settings.
- Click “Save and deploy.”

Step 5: Monitor Your Deployment and Access Your Site
After clicking “Save and deploy,” AWS Amplify will:
- Provision Resources: Set up the necessary S3 bucket and CloudFront distribution behind the scenes.
- Clone Repository: Fetch your code from GitHub.
- Build: Execute the defined build commands. You can watch the build logs in real-time in the Console.
- Deploy: Upload the built static assets to the hosting environment.
- The entire process usually takes a few minutes for a typical static site.
- Once the deployment is complete, you’ll see a green “Deployed” status, and a generated domain URL (e.g.,
https://main.d123abc456def.amplifyapp.com) will appear. Click this URL to visit your live website!
What Happens on Subsequent Pushes?
This is where the magic of CI/CD shines. From now on, whenever you push new changes to the connected branch in your GitHub repository:
- Amplify Console automatically detects the change.
- It triggers a new build.
- Upon successful build, it performs an atomic deployment, updating your website with the latest changes with zero downtime.
This means your website is always synchronized with your GitHub repository, streamlining your CI/CD workflow effortlessly.
👉 Ask our Educational Tutor now!
Next Steps and Advanced Features
- Connect Custom Domains: In the Amplify Console, under “Domain management,” you can easily add your custom domain. Amplify will guide you through setting up DNS records (CNAME or A records) and automatically provision an SSL certificate.
- Add Feature Branches: Under “Branch deployments,” connect additional branches from your GitHub repository. Amplify will automatically create unique deployment environments for these, perfect for testing new features without affecting your main production site.
- Password Protection: For staging or internal sites, use “Access control” to add basic username/password protection.
- Environment Variables: Securely manage runtime environment variables for your application (e.g., API keys, database connection strings) via the Amplify Console’s environment variables section. These are injected securely during the build process.
- Monitoring: Integrate with Amazon CloudWatch for monitoring your application’s performance and setting up alarms.
- Backend Integration: While this article focuses on static sites, Amplify can also provision and integrate full-stack backends (authentication, databases, APIs) using the Amplify CLI and Amplify Studio.
Conclusion: Your Static Site, Automated and Optimized
AWS Amplify Console with GitHub integration provides an incredibly efficient and robust solution for deploying static websites with continuous integration and continuous delivery (CI/CD). By abstracting away the complexities of infrastructure management and automating the deployment pipeline, it allows developers to focus purely on building amazing web experiences.
Whether you’re hosting a simple portfolio, a documentation site, or a complex React application, Amplify Console empowers you to achieve rapid deployments, high availability, and strong security, making it an indispensable tool in your modern web development toolkit. Say goodbye to manual deployments and embrace the power of AWS Amplify static site CI/CD!


