Working with text
Creating a paragraph
In HTML, creating a paragraph is simple as entering text. To create a paragraph, move the cursor to the location where you want the paragraph in the HTML editor you are using. Next, type the <p> tag to begin the paragraph. (Yes, if you guessed, the “p” inside the <p> tag stands for paragraph.) Once you are done typing or pasting text for the paragraph, close the <p> tag with </p>. Closing the tag instructs the browser that the paragraph has ended.
As an example, we will create the following paragraph with the <p> tag:
To learn HTML and other web programming languages, come to ScripBuzz.com regularly. The web site is updated daily with new content. The web site is succeeding because visitors like you keep coming back and find the site simple to use, easy to understand, and resourceful.
To create the above paragraph, you would write the following code:
<html><title>How To Create Paragraph</title><body><p>To learn HTML and other web programming languages, come to ScriptBuzz.com regularly. The web site is updated daily with new content. The web site is succeeding because visitors like you keep coming back and find the site simple to use, easy to understand, and resourceful.</p></body></html>
The output of the code shown above would look like:
To learn HTML and other web programming languages, come to ScriptBuzz.com regularly. The web site is updated daily with new content. The web site is succeeding because visitors like you keep coming back and find the site simple to use, easy to understand, and resourceful.
Text alignment with the align attribute
The normal text alignment depends on how the text is read in the browser’s default language. If the text is read, for instance, from left to right, the normal alignment is left. On the other hand, if the text is read from right to left, the normal alignment is right.
If you want to change the normal alignment of the text, you can use the align attribute. With the attribute, you could use one of these values:
- left
- right
- center
- justify
Left alignment
To align text to the left margin, set the align attribute to left:
<p align="left">This paragraph uses the left alignment. If a language is read from left to right and the browser is set to that language, the default alignment is left. When the text is aligned automatically to the left, use of the align attribute with the value left is not necessary.</p>
Output of the above code:
This paragraph uses the left alignment. If a language is read from left to right and the browser is set to that language, the default alignment is left. When the text is aligned automatically to the left, use of the align attribute with the value left is not necessary.
Right alignment
To align text the right margin, set the align attribute to right:
<p align=”right”>This paragraph uses the right alignment. If a browser’s default language is read from right to left, the default alignment is right. When the text is aligned automatically to the right, use of the align attribute with the value right is not necessary.</p>
Output of the above code:
This paragraph uses the right alignment. If a browser’s default language is read from right to left, the default alignment is right. When the text is aligned automatically to the right, use of the align attribute with the value right is not necessary.
Center alignment
To change the alignment of the text to the center of the page, set the align attribute to center:
<p align="center">This paragraph uses the center alignment. Aligning text center is easy: simply set the align attribute to center or use the <center> tag.</p>
Output of the above code:
This paragraph uses the center alignment. Aligning text center is easy: simply set the align attribute to center or use the <center> tag.
Justified alignment
When you want to continue the text to the right and left margins, set the align attribute to justify:
<p align="justify">This paragraph uses the justify alignment. The paragraph is justified: the text continues to both margins.</p>
Output of the above code:
This paragraph uses the justify alignment. The paragraph is justified: the text continues to both margins.
Character tags: logical and physical
A tag that is applied to an individual character is known as a character tag. A character tag can be grouped into two categories: physical and logical.
(Note: physical styles are associated with physical character tags; logical styles are associated with logical character tags.)
As you work with these tags to style your text in different ways, you will discover that there is not really big difference how the text is displayed on a browser. For instance, you can italicize your text using the <i> tag (a physical character tag) or <em> tag (a logical character tag). Why does that make any difference? It depends on whether you are using italics for the sake of using italics or whether you are using italics to convey some special meaning. While a physical character tag controls how to format the text, a logical character tag describes how the text is being used, without regard to how it should be formatted. Thus a logical style would be used to convey some meaning while a physical style would not.
Physical styles
As mentioned above, a physical character tag controls how the characters are formatted. For instance, you might display some characters as bold or italic. Listing 1 displays some common physical character tags.
| Listing 1 common physical character tags | ||
|---|---|---|
| Tag | Description | Renders as |
<b> | bold | displays text as bold |
<big> | big | displays text in a big font |
<i> | italics | displays text as italic |
<s> or <strike> * | strike | displays text with a line through it |
<small> | small | displays text in a small font |
<sub> | subscript | displays the text as subscript — text that displays below the baseline of the text |
<sup> | superscript | displays the text as superscript — text that has baseline above the baseline of the rest of the text |
<tt> | teletype | displays the text with fixed-width font |
<u> | underline | underlines the text |
| * Both <s> and <strike> tags are deprecated in HTML 4.0 so instead use the <del> tag. | ||
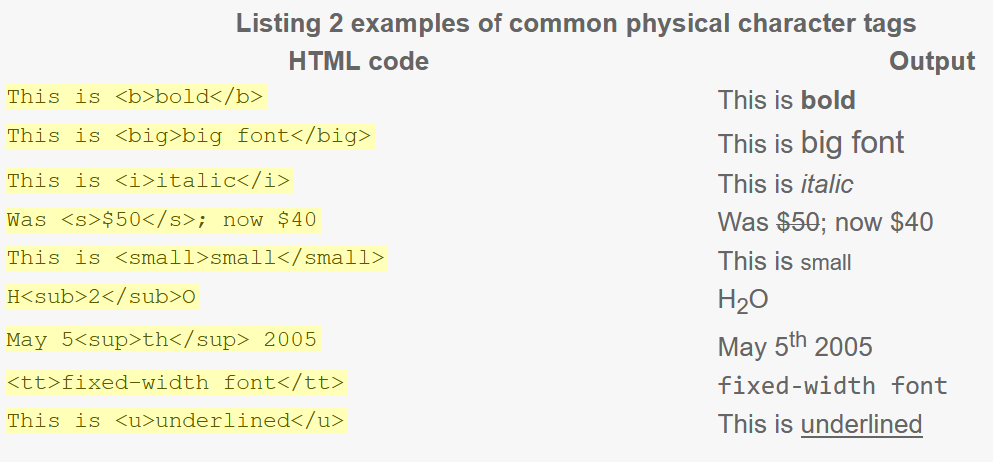
Listing 2 displays some examples of the common physical character tags.
Logical styles
A logical character tag describes how the text is being used, not necessarily how it is formatted. Listing 3 displays common examples logical character tags.
| Listing 3 common logical character tags | ||
|---|---|---|
| Tag | Description | Renders as |
<cite> | citation | emphasizes the text in italics. |
<code> | code sample | Displays some characters as code usually in Courier font (i.e., fixed-width font) |
<del> | deleted text | displays text with a line through it; renders differently in Netscape and Internet Explorer |
<dfn> | definition | italics; renders differently in Netscape and Internet Explorer |
<em> | emphasis | emphasizes the text in some way usually as italic. |
<ins> | inserted text | underlined; renders differently in Netscape and Internet Explorer |
<kbd> | code sample | fixed-width font |
<samp> | code sample | fixed-width font |
<strong> | strong | Text is emphasized more strongly than usually as bold. |
<var> | program variable | italics |
Listing 4 provides examples of how logical tags may display on a browser.
| Listing 4 examples of logical tags | |
|---|---|
| HTML code | Output |
This is used for a short <cite>quote</cite>. | This is used for a short quote. |
<code>y = m * x + b</code> | y = m * x + b |
<del>Deleted</del> text | |
<dfn>definition</dfn> text | definition text |
This is <em> emphasized </em>. | This is emphasized . |
<ins>inserted</ins> text | inserted text |
<kbd>code</kbd> sample | code sample |
<samp>code</samp> sample | code sample |
This is <strong>strong</strong>. | This is strong. |
<var>program</var> variable | program variable |
Note that both logical and physical tags are two-sided tags (requiring an opening and closing tag). Also, the character tags can also be nested to format some text as
<b><i>this is bold and italicized</i></b>
which will result in :
this is bold and italicizedWhen you nest tags, make sure to closed them properly. Although the output of the following code is same, the tags are not closed properly:
<b><i>this is bold and italicized</b></i>
Do you notice why? Well, because the tags are overlapped: the <i> tag should be closed first because it was the last tag that was opened. The <b> tag should be closed last as it is the first tag that is opened. In general, a tag that is opened last, should be closed first. A tag that is opened first should be closed last.
In summary, use the characters tags to either format text with physical tags or to describe some text with predefined logical tags. Also, remember to properly close nested tags.
Creating headings
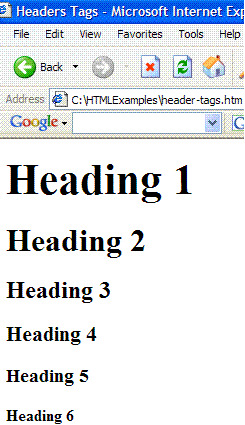
There are six headings in HTML. Each heading can be created with an HTML header tag, one header tag for each level of heading. Header tags are range from <h1> to <h6>, where <h1> is the largest and most prominent and <h6> is the smallest. To use a header tag, use the following syntax
:<hn>Some text</hn>where n is a number between 1 and 6.
Figure 1 shows how to use all of the six headings as an HTML code on the left and the output from a browser is shown on the right.
<h1>Heading 1</h1><h2>Heading 2</h2><h3>Heading 3</h3><h4>Heading 4</h4><h5>Heading 5</h5><h6>Heading 6</h6>
HTML lists: ordered, unordered, and definition
Lists are very important to any document as they allow you to make your key points stand out from the rest of the text. HTML supports three lists:
- unordered (bulleted) — click this link to learn how to create an unordered list.
- ordered (numbered) — click this link to learn how to create an ordered list.
- definition — click this link to learn how to create a definition list.
Unordered (bulleted) list
The most commonly used list is the unordered list. An unordered list can be used whenever the order of items you want to list is unimportant. HTML offers three different default characters to use with an unordered list: a bullet (![]() ), a circle (
), a circle (![]() ), and a square (
), and a square (![]() ). The following shows examples of an unordered list:
). The following shows examples of an unordered list:

Unordered list — type bullet (default)

Unordered list — type circle

Unordered list — type square
Ordered (numbered) list
The other popular kind of list is the ordered list. This type of list can be used when the order of items to list is important. It could be that you want to list steps to how to cook a recipe; for this kind of list you could use an ordered list because each step can be emphasized numerically. An ordered list can be created with different styles: Arabic numbers, lowercase or uppercase letters, or lowercase or uppercase Roman numerals. The following shows examples for each of these styles:

Ordered list style: Arabic numbers (default)

Ordered list style: lowercase letters

Ordered list style: uppercase letters

Ordered list style: lowercase Roman numerals

Ordered list style: uppercase Roman numerals
Definition list
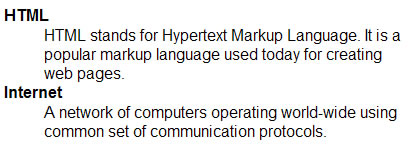
The definition list is used far less frequently than the other two kinds of lists mentioned above. A definition list, as the name implies, is used for listing definitions:
Click here to learn how to create a definition list.
Nested lists
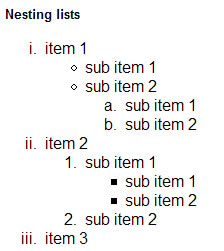
Sometimes, a list is long and may require subordinate lists. Mastering multiple lists within a single list is easy once you learn how to create a single list. (See this page to learn how to create nested lists.) The following shows an example of a nested list:
Line breaks
To add a line break in a web page, you can use the <br> tag. Typing a <br> tag in your HTML code is similar to pressing the ENTER or RETURN key in a word processor. The effect of <br> tag is that the browser stops printing text on that line and drops down to the next line on that page. The <br> tag does not require a closing tag. The following shows an example:
Line breaks<br> in HTML
instructs the browser to start a new line after the word “breaks” because after this word the tag <br> is placed. Thus the output of the above code is:
Line breaks
in HTML
To add multiple line breaks in a row, simply use the <br> tag for each line you want to stop and start. For instance,
Line breaks <br><br><br> in HTML
inserts three line breaks after the word “breaks”. The following shows the output of the above code:
Line breaksin HTML
Preformat text
With the <pre> tag, the text renders in the browser exactly as you type it. The <pre> tag is short for preformat. So if you press the ENTER or RETURN key several times to create line breaks within a <pre> tag, you can expect to see all those line breaks in a browser.
The following shows the <pre> tag in use:
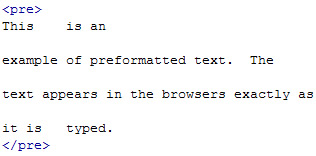
<pre> tag in use to preformat text
That prints:
This	is an

example of preformatted text.  The

text appears in the browsers exactly as

it is  typed.
This example creates a tubular data:

Tabular data with pre tag
A	|	B
C	|	DD
Notice the tabs and the line breaks in each example above are expectedly present in the output. However, the output of the <pre> tag is not guaranteed to remain as visualized for these reasons:
- The <pre> tag may produce different outputs on different browsers. Spaces and tabs may be interpreted differently on different browsers.
- The <pre> tag usually displays text in a monospaced font (i.e., Courier).
The use of <pre> tag is useful for displaying programming code.
Quotation blocks
Quoting a large body of text and making it stand out from the rest of text can be accomplished with the <blockquote> tag. The tag indents the quotation block on both the left and right, and also adds a blank line above and below. The amount of indentation used on both sides may vary from browser. The following code shows the <blockquote> tag in use:
<p>This is some text before the quotation.</p><blockquote>This is a long blockquote created with the <blockquote> tag.</blockquote>
The following shows the output of the above code:
This is some text before the quotation.
This is a long blockquote created with the <blockquote> tag.
Controlling the font size with the <font> tag
Occasionally, you may change the appearance of text for extra emphasis. For example, you may make the text bold, a heading, or just increase its size than the surronding text. This page explains how to use the <font> tag to control the font size.
To control font size, use a font size value of 1 – 7, where font 1 is the smallest and 7 is the largest. Listing 1 shows the HTML code and the corresponding 7 different font sizes.
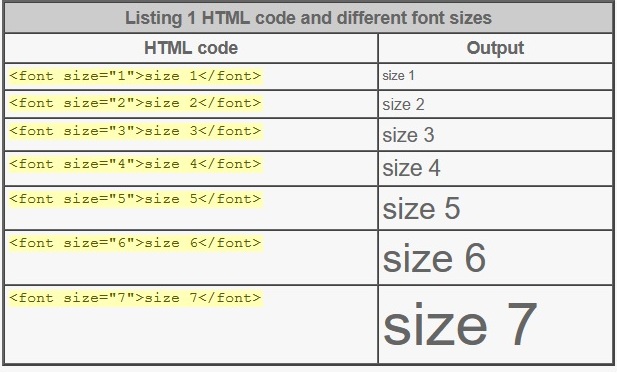
Notice to control the size of the font, we used the size attribute. An attribute adds an extra instruction to the tag with the specified value. Thus an attribute consists of the name of the attribute and a value. For instance, in the first example in listing 1, size is an attribute and the value is 1.
Changing the font color with the <font> tag
To control the color of a font, we use the color attribute with a color value. For the value, you can specify either the name of the color or a RGB value. A name of the color could be like “red”, “green”, “blue”, etc.
To select colors with RGB values, set the color attribute to “RRGGBB”, in which the first two letters RR stands for red. Each of the 2 R’s can be substituted with a number value 0 – 9 or the letters A – F. “0” represents absence of the color red, while the letter “F” represents the most amount of color red. The next two letters GG stands for green and can be substituted with the same values as for the color red. The last two letters BB stands for blue and can be substituted with the same values as for the previous two colors.
Listing 2 examples shows examples of changing color of a font with using a name or RGB value of color.
| Listing 2 Changing the font color | ||
|---|---|---|
| Color Name | Color value | Output |
<font color="red">Red</font> | <font color="FF0000">Red</font> | Red |
<font color="green">Green</font> | <font color="00FF00">Green</font> | Green |
<font color="blue">Blue</font> | <font color="0000FF">Blue</font> | Blue |
Changing the font face with the <font> tag
The last property of the font that we can control with a <font> tag is the font face. You can use the face attribute to specify the type of font that should be used to display some text. For instance,
<font face="verdana">this text is displayed using the verdana font face.</font>
outputs
this text is displayed using the verdana font face.Because not all browsers support all fonts, you can supply more than one similar font face value but up to three by separating each with a comma as:
<font face="arial, serif, times">Some text</font>
When you specify more than one font face value, the browser checks if the first font face value is available to the browser; if it is, then, the browser uses the first font face value. If the first font face value is not available, then, the browser tries the second one and so forth until it tries all three font face values. If all of the three font face values are not available, the browser uses the default browser font face value.
Combining <font> tag attributes
When you have to control size, color or face of a font at the same time, you could use separate font tags as:
<font size="5"><font color="yellow"><font face="arial">Some text</font></font></font>
Specifying individual attribute with separate <font> tags is insufficient as the browser has to process these extra tags. Additionally, it is confusing and long. Instead of individually specifying the size, color, or face of a font, you can combine all three into one <font> tag:
<font size="5" color="yellow" face="arial">Some text</font>.
That outputs:
Some text.Conclusion
The <font> tag provides limited control over changing the appearance of the text. Web authors have more flexibility in controlling the appearance of the text with Cascaded Style Sheets.
Horizontal rules
To break up an HTML document into separate sections, you can insert a horizontal line (rule). A horizontal rule is inserted by the <hr> tag. The <hr> tag is one-sided, meaning it does not require a closing tag. Let’s look at an example:
Inserting horizontal lines<hr>As several sections are added to a web page, they can be separated into visually distinct regions by a horizontal rule.
So where should you expect a horizontal rule? Our horizontal rule should be printed after the first line (“Inserting horizontal lines”), as shown below:
Inserting Horizontal lines
As several sections are added to a web page, they can be separated into visually distinct regions by a horizontal rule.
<hr> attributes
The <hr> tag has several attributes that control the size and the appearance of the horizontal rule. For instance, the size attribute controls the rule’s thickness (height) in pixels. The width attribute controls the rule’s width in percentages or pixels. The align attribute sets the alignment of the rule to left, right, justify, or center. (Note the default rule’s alignment is center.) Finally, the noshade attribute renders the rule without a surrounding shadow. The following HTML code for each of these attributes in use:
| Horizontal rule of size 12: | <hr size="12" /> |
| Horizontal rule of size 12 and width 20%: | <hr size="12" width="60%" /> |
| Horizontal rule of size 12, width 300 pixels, and aligned left: | <hr size="12" width="60%" align="left" /> |
| Horizontal rule of size 12, width 300 pixels, and aligned right: | <hr size="12" width="60%" align="right" /> |
| Horizontal rule of size 12, width 300 pixels, and aligned justify: | <hr size="12" width="60%" align="justify" /> |
| Horizontal rule of size 12, width 300 pixels, and no shading: | <hr size="12" width="60%" noshade="noshade" /> |
The following shows the output of the above code:
Horizontal rule of size 12:
Horizontal rule of size 12 and width 20%:
Horizontal rule of size 12, width 300 pixels, and aligned left:
Horizontal rule of size 12, width 300 pixels, and aligned right:
Horizontal rule of size 12, width 300 pixels, and aligned justify:
Horizontal rule of size 12, width 300 pixels, and no shading:
Divisions (with the div tag)
To structure HTML documents into divisions or sections, the <div> tag is used. The <div> tag specifies a logical block without predefined meaning or rendering infomration. Orginally, the tag was mostly used to align sections of content in a document with the align attribute. The followings shows an example:
<div align="right"><h4>Division heading</h4><p>Paragraph 1. This text is right-aligned. The div affects paragraph and other block elements.</p><p>Paragraph 2. This text is also right-aligned.</p></div>
The following shows the output of the above code:
Division heading
Paragraph 1. This text is right-aligned. The div affects paragraph and other block elements.
Paragraph 2. This text is also right-aligned.
Although it is not apparent from the above the example, the <div> tag produces a line break after the tag is closed (</div>) . The <div> is a block element.
Styling with <div> tag
The <div> tag is today commonly used to apply style sheet fomatting properties to a desired part of a document. See the following as an example:
<div style="color:#CC3333; text-align:right;"><p>Paragraph 1 inside div tag 1.</p><p>Paragraph 2 inside div tag 1.</p></div><div style="color:#00CC66"><p>Paragraph 1 inside div tag 2.</p><p>Paragraph 2 inside div tag 2.</p></div>
That produces
Paragraph 1 inside div tag 1.
Paragraph 2 inside div tag 1.
Paragraph 1 inside div tag 2.
Paragraph 2 inside div tag 2.
In the first <div> tag we change the color of the text and right-align the text. In the second <div> tag we only change the color of the text and keep the default text alignment (left).
