Adding hyperlinks
To make other documents easily accessible, a hyperlink is used. A hyperlink is a part of the web page that user clicks on to view the destination document. Thus a link basically instructs a browser to load a new URL (page). A document that contains hyperlinks is referred to as hypertext document.
There are four main types of hyperlinks:
- relative — linking local pages using relative file names
- absolute — linking to local or extrenal pages using absolute file names
- reference — linking to specific locations or sections of a page
- email — linking to an email address
A link is created with an <a> tag. The “a” in <a> stands for anchor thus it is called an “anchor tag” or simply link tag. An anchor tag is a two-sided tag and uses a href attribute to specify the destination of the link. The href attribute stands for Hypertext Reference.
Understanding URLs
To be able to create links, you need to understand URLs. A URL stands for uniform resource locator (URL) and it has several parts:
- Protocol
- Domain name
- Directory (folder)
- Filename and file extension
The following example shows these parts in a URL:
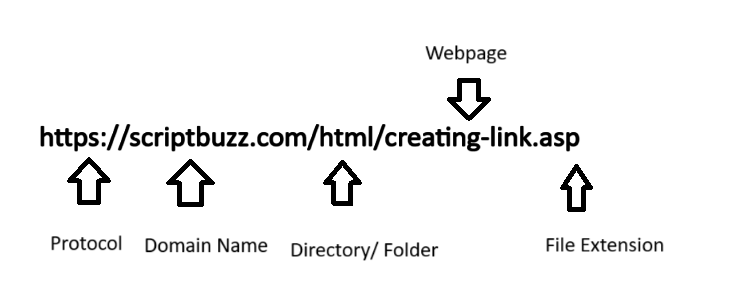
The first part, as the graphic shows above, of a URL is the name of the protocol: http. The http protocol is a set of rules that enables web browsing. Specifically, we want to use the http protocol to access http://www.scriptbuzz.com/html/creating-links.asp.
The second part of the URL is the domain name. The domain name simply is a text name that corresponds to the IP address of the server that serves that web site. Because a text name is easier to remember and recognize, a domain name is used rather than an IP address. (The IP address that corresponds to scriptbuzz.com is 11.66.96.247 thus we could have used http://11.66.96.247/html/creating-links.asp. However, again a domain name is much easier to remember and recognize than using IP address.) You may have seen domains that end with .edu (for education), .org (for organization), .info (for information), .mobi (for mobile), etc. When creating links, use a valid domain name (including .com, edu, or .info) and avoid use of IP addresses.
The third part of the URL specifies the directory or the folder name. The directory simply is the actual location of the file we want to access/link: creating-links.asp. To avoid broken links, ensure the directory exists and contains the file that you want to link to.
The last part of the URL is the file name: creating-links.asp. When creating links, make sure the file exists and that you use the appropriate file extension (such as .htm, .html, .asp, or .php).
It is a good practice to first access the URL before using it as a link. Doing that will ensure:
- you are linking to a valid URL. If you don’t access the page, how would you know if it exists?
- indeed it is the page you intend to link to
Relative link
When creating links, we need to reference the files with each file’s location, known as file’s path. HTML supports two kinds of file paths: relative and absolute. A relative path refers to a file’s location that is relative to the folder in which the file is in. A relative link is the easiest kind of link to create since you only need to reference the file name (because the file is in the same directory).
Let say on Scriptbuzz.com’s website there is one folder called html and it has two web page files saved as: headings.asp and paragraph.asp. See figure 1 below as an illustration. To create a link in headings.asp to the paragraph.asp file, we will use just the filename. Specifically, link tag will look something like:
<a href="paragraph.asp">How to create a paragraph</a>
Recall that a link tag is created with an anchor tag <a>. The href property contains the destination file. In the example above the destination file is paragraph.asp. The text “How to create a paragraph” is the link text, the text that activates the link when clicked. Output: How to create a paragraph.
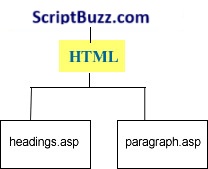
| A link to a file within the same folder. The HTML folder in this illustration has two files: headings.asp and paragraph.asp. Linking one of these files to another is an example of a relative link. |
How does the link work without a fully qualified URL? The current URL (http://www.scriptbuzz.com/html/headings.asp) of the page helps the browser figure out the new URL (http://www.scriptbuzz.com/html/paragraph.asp). How? With a relative link, the browser assumes any information you leave out when creating the link is equivalent to the information it used to get to the current page. So if we are accessing http://www.scriptbuzz.com/html/headings.asp and this page has a link to paragraph.asp, and when we click on this link, the browser will access http://www.scriptbuzz.com/html/paragraph.asp. So in the new URL, only piece of information changed is just the file name: from headings.asp to paragraph.asp. Thus with relative links, we can link to files in the same directory by just using their file names.
Absolute link
An absolute link shows the entire destination address in the link tag. This exact destination address is referred to as an absolute path. You might be thinking but why cannot we use just the file name or just the relative path? Well, the relative path (see creating relative links for more information) is only good for linking to files that are in the current folder. To link to files which are outside of the current folder, an absolute path needs to be used. Thus an absolute link is used for linking to files that are outside of the current folder; a relative link is used for linking to files that are within the same folder. An absolute link is also used for linking to other websites.
Let’s first work with an example that uses an absolute path of a file for creating a link within the same website. The second example will show you how to create a link to an external website.
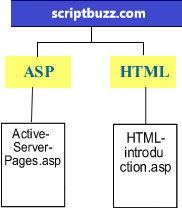
In this example, we have two folders: ASP and HTML. If we link Active-Server-Pages.asp file to the HTML-introduction.asp file, we would need to reference the folder name because the HTML-introduction.asp file is outside of the ASP folder.
So for the first example assume that we have two folders: asp and html. Assume further that we have one web page in each of these two folders : asp folder contains a file named Active-Server-Pages.asp and the html folder has a file called HTML-introduction.asp. See figure 2. To create a link from the Active-Server-Pages.asp file to the HTML-introduction.asp file, we would need to reference the folder name and the file in our link tag:
<a href="html/HTML-introduction.asp">Introduction to HTML</a>What does the above link tag mean? It starts with the usual anchor tag (<a>), which is required when linking to other documents. Next, to instruct the computer which document we want to link to, we use the HREF property that contains the destination document. The destination document is a folder named html and a file named HTML-introduction.asp. “Introduction to HTML” is the link text for this example. Output: Introduction to HTML.
In our second example, we will create a link to http://www.google.com. To create any link in HTML, we have to use the anchor tag with the HREF property. To create a link to www.google.com, we use the following code:
<a href=http://www.google.com>Google</a>
Notice in this example the HREF property starts with “http://www.” because we want to link to a webpage that is outside of our current website. The domain name (in this case google.com) loads the default webpage from that particular website. Output: Google. If we wanted to load a specific webpage from a particular website, you can add the specific webpage after the domain name; see table 1 for some examples.
| Table 1 | |
|---|---|
| URL | http://www.scriptbuzz.com/site-map.htm |
| Code | <a href=”http://www.scriptbuzz.com/site-map.htm”>Site Map</a> |
| Description | Loads the site map of Scriptbuzz.com’s website. The file site-map.htm is listed after the domain name and forward slash. |
| Output | Site Map |
| URL | http://www.scriptbuzz.com/scripting-tools/scripting-tools.asp |
| Code | <a href=”http://www.scriptbuzz.com/scripting-tools/scripting-tools.asp”>Scripting Tools</a> |
| Description | In this example, we use the folder name “scripting-tools” after the domain name. Then, we use the forward slash and list the specific web page: scripting-tools.asp. |
| Output | Scripting Tools |
Reference link
A reference link points to a specific part of a web page. How is this different from other links? Both relative links and absolute links are used for linking to other webpages. But what if you wanted to link to a special part of a webpage? What do you do? You use a reference link.
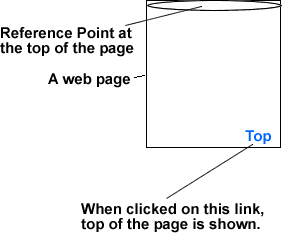
Figure 3 shows a common example of a reference link. The example shows that we have a link labeled as “Top” on the bottom of the page. When a user would click on this link, the web browser will show the top of the page. You might be wondering how does the browser know that it needs to show the top of the webpage? In the figure, our reference point is defined at the top of the page thus the top of the page will be shown. Conversely, you could define a reference point on the bottom of the page and create a link on the top of the page to that reference point. In this case, when you click on that link, the bottom of the page will be shown.
Now let’s go over the HTML code that will create the reference link. To create a reference link, follow these two simple steps:
- define the reference point
- create your link to that reference point
So how do you define a reference point? To define a reference point on your webpage, use the anchor tag (“<a>”) with the name attribute. Note that you should use a unique and a qualified name for your reference point. In other words, don’t define more than one reference point with the same name on the same page; also avoid using space characters for the reference point. The following
<a name="top"></a>
defines a reference point called top. Notice there is nothing between the opening and closing tags and that’s how it should be.
Now, to create a link to that reference point, use the anchor tag with the href attrinute. Recall with the href property we indicate the destination source of the link. Because with this example we want to link to a reference point on the same page, we do not need to include any filename inside the href property; instead, we include the reference point after the pound sign :
<a href="#top">Top</a>
That says link to a reference point called “top” and use the text Top as the link text.
Creating an email link
When a person clicks on an email link, the person can send email to the specified email address in the HREF property. Note simply clicking on an email link does not send the email; it rather copies the recipient’s email address into the user’s default email editor program, if any, for user’s convenience. To create an email link, we use the <a> tag with the HREF property set to the desired email address. For instance,
<a href="mailto:info@scriptbuzz.com">info@scriptbuzz.com</a>creates an email link with the destination email address as info@scriptbuzz.com. Notice because this is an email address, we specified “mailto:” before the email address. The link text for this link is simply the same as the email address. Output: info@scriptbuzz.com.
Changing link colors
As you may have noticed while browsing websites, the default link color for browsers is blue, the default visited link color is purple, and the default active link color is red. What do you do if these default colors do not work for you because of the regular color of other text on your webpage and/or because of the background of your webpage? Well, you can change the default link colors. To change these default link colors, you can use three attributes in the body tag or define link colors in a style sheet.
Changing link colors with link attributes of the <body> tag
The three link color attributes of a webpage are:
- link — this changes the normal link color. In other words, this attribute changes the default blue color of the links to some other color of your choosing.
- vlink — this attribute changes the visited link color. With this attribute, you can change the default visited purple link color to some other color of your choice.
- alink — This attribute changes the active link color. An active link color simply means the displayed link color when the mouse button is pressed over a link.
These attributes should be added to the <body> tag with a choice color for each attribute:
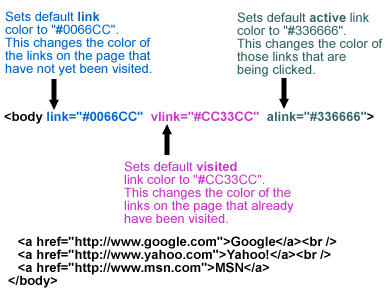
Output:


Changing link colors with style sheet declaration
Because the three attributes discussed above (link, vlink, and alink) are deprecated in favor of style sheets, you should change the link color using style sheets. This, however, does not mean your HTML document would be invalid if you use those attributes in the body tag to change link colors; rather, consider using the style sheet declaration to change link colors in case if in the future browsers stop supporting these deprecated attributes.
The following shows an example of style sheet declaration to change link colors:
<style>
a:link {color:#0066CC;} /* sets normal link color */
a:visited {color:#CC33CC;} /* sets visited link color */
a:active {color:#336666;} /* sets active link color */
</style>
Notice this declaration uses the same colors we used earlier with the link attributes thus the output will be same. Place this style sheet declaration between the <head> and </head> tags. Inside the body tag, create your links as normal.
Note: Because the user’s preferences on the browser ultimately control the link colors, you cannot always change the link colors for all the browsers used to display a particular page. This, however, should not stop you from changing the default link colors because:
- your website requires different link color (because of the surrounding text or the background of the page).
- average user does not know how to change the default link colors or to set their browser to ignore style sheet formatting.
Setting link title
To help users navigate a website, you can add the optional title attribute to the link tag: <a>. With the title attribute, you can provide additional information to the user about the link. Although the title attribute causes different browsers to do different things, generally speaking the title text appears as a “tool tip” when the visitor moves the mouse over the link.
In the following example, we add some additional information about the link using the title attribute:
<a href="http://www.google.com" title="Click this link to go to www.google.com!">Visit www.google.com</a>The following shows the output:
Visit www.google.com| Output showing the title text when the mouse is moved over the link |
Setting tab order for links
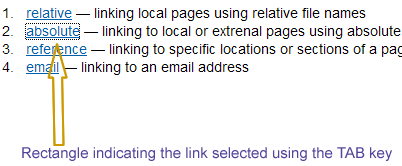
To help users who cannot use mouse, the tabindex attribute can be added to the anchor tag to use specific tab order of links. When you customize the order of links, browsers generally highlight each link, from top to bottom of the web page, each time the tab key is pressed. Once a link is selected and highlighted, the user can press ENTER or RETURN key to visit the selected page. The following shows a link selected with a TAB key:
The following code shows how to customize the tab order with tabindex:
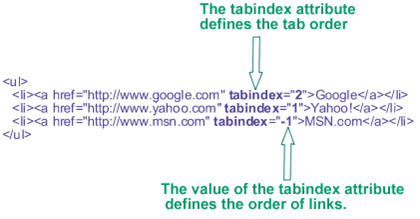
In the top example, we set tab order for our three links as follows:
– First, Yahoo! because it has the tabindex value set to 1
– Second, Google because it has the tabindex value set to 2
– By assigning a negative value to tabindex, we are excluding MSN link from the tab order
The following shows the output of the code; notice if you use the tab key, the link Yahoo! will be highlighted first, Google second, and MSN link is highlighted after all other links above this link, from top to bottom of this page, are highlighted:
Adding keyboard shortcuts to links
With the accesskey attribute, you can assign keyboard shortcuts to links. The idea behind creating keyboard shortcuts is to simply allow the user to quickly visit a page by using the access keys value corresponding to the link. In Windows, use ALT-X (where X represents a numerical value assigned with accesskey attribute) keys from the keyboard to open the desired link.
When defining keyboard shortcuts for links, make sure you include the keyboard shortcuts next to each link. If, however, you do not display the keyboard shortcuts, user won’t know you have defined keyboard shortcuts. Thus users cannot use those shortcuts for links!
The following shows how to use the accsskey to define keyboard shortcuts to links:
- <a href=”../asp/Active-Server-Pages.asp” accesskey=”1″>Start learning ASP</a> (ALT or COMMAND 1)
- <a href=”html.asp” accesskey=”2″>Start learning HTML</a> (ALT or COMMAND 2)
- <a href=”../javascript/scripting-javascript.asp” accesskey=”3″>Learn JavaScript</a> (ALT or COMMAND 3)
For the first link above, we assign the accesskey 1 to designate the shortcut ALT 1 in Windows (and COMMAND 1 under MAC) to use this link. For the second link, we set the accesskey to 2 and thus to use this link ALT 2 can be used. Because accesskey attribute is set to 3 for the third link, ALT 3 can be used to activate this link. The following shows the output of the code:
- Start learning ASP (ALT or COMMAND 1)
- Start learning HTML (ALT or COMMAND 2)
- Learn JavaScript (ALT or COMMAND 3)
